
Create an Online Store in Oolio One Back Office to allow customers to place Pickup, Dine In, Delivery or Catering orders online. Online Store settings control when orders can be placed, available payment options, preparation and scheduling, customer notifications, and how orders are sent to POS.
Before starting
Make sure the Location that will use the Online Store has been configured.
Have the following ready:
- Store contact details and address.
- Merchant Code and Store Reference ID for online payments.
- Required fulfilment hours.
- Order Types that will be available online.
- Preparation and scheduled order requirements.
- Store logo and brand colour, if required.
Step 1: Create the Online Store
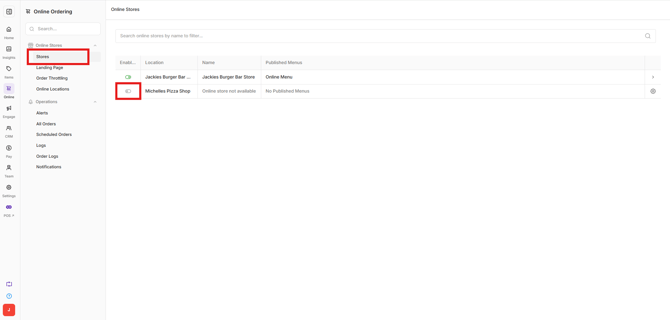
- In Oolio One Back Office, open Online > Stores.
- Find the required Location and enable it to begin setting up the Online Store.
Step 2: Configure the Store details
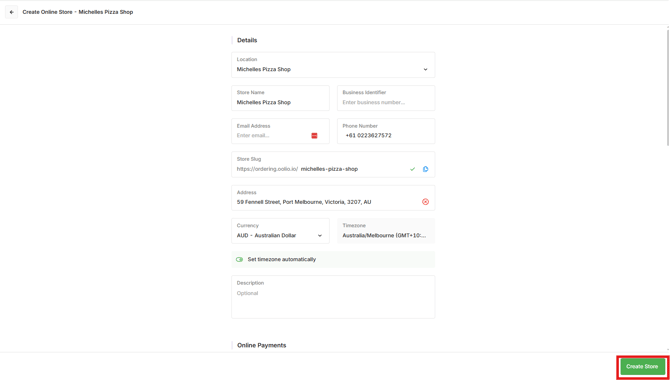
Enter the information used to identify the Store and display its details to customers.
-
Details:
- Enter the Store Name that should appear on the Online Store.
- Enter the Business Number.
- Enter the Contact Email Address and Contact Phone Number for the Store.
- Enter the Store Slug used for the Online Store URL.
- Confirm the Store's physical address.
- Select the required Currency.
- Review the Timezone, which is automatically set from the Location details.
- Add a short Store Description. This appears in the Store details on the Online Store.
-
Online Payments:
-
Enter the:
- Merchant Code
- Store Reference ID
-
Contact Oolio Support if these details are required.
-
Go to the Adjustments page to enable the payment surcharge if a surcharge should apply to online payments.
-
-
Appearance:
- Select the Brand Colour.
- Upload the Store logo and a Banner Image.
- Add social media links, if required.
-
Training Mode:
-
Enable Training Mode when the Online Store needs to be tested without processing real payments.
-
When Training Mode is enabled:
- Orders sent to POS are marked as Training.
- Payments are disabled.
- The online ordering workflow can be tested without processing real transactions.
-
Note: Training Mode is compatible with Oolio One POS only.
-
Select Create Store when the initial setup is complete.
-
After creating the Store, select the arrow beside it to configure the remaining settings.
Step 3: Set opening hours
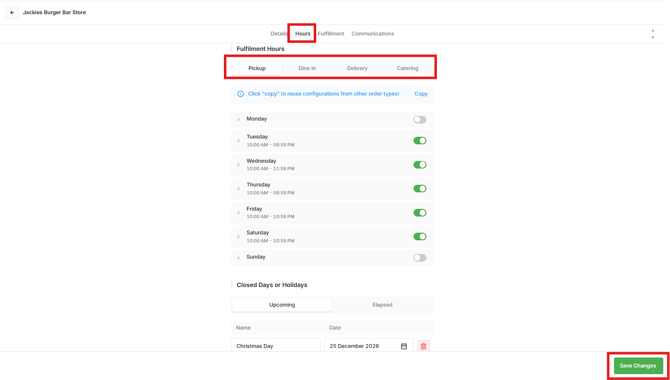
Fulfillment Hours control when each Order Type is available for customers to place orders.
-
Configure the trading hours for each required Order Type:
- Select the Order Type to configure.
- Set the opening and closing time for each day the Order Type should be available.
- Select the green + to add an additional service period on the same day. For example, add separate lunch and dinner periods.
- Turn off any days when the Order Type should not be available.
- Select Save Changes
-
Add Closed Days or Holidays for one-off dates when the Online Store should not accept orders:
- Select the green +.
- Add the required closed date, such as Christmas Day.
- Repeat for any additional dates.
- Select Save Changes.
Step 4: Configure fulfilment settings
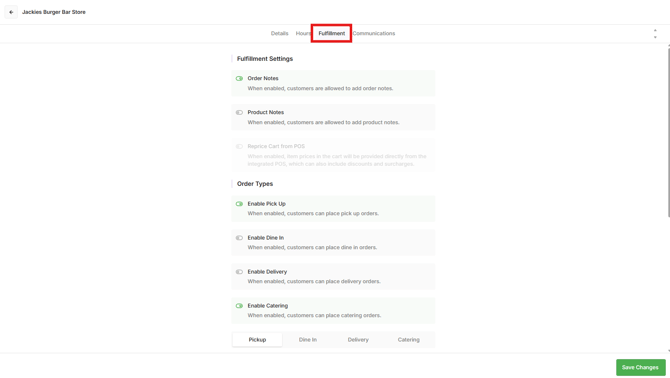
Open Fulfilment to configure settings that apply across the different Order Types.
Fulfillment Settings:
- Enable Order Notes to allow customers to add a note to the overall order.
- Enable Product Notes to allow customers to add notes to individual products.
Order Types:
-
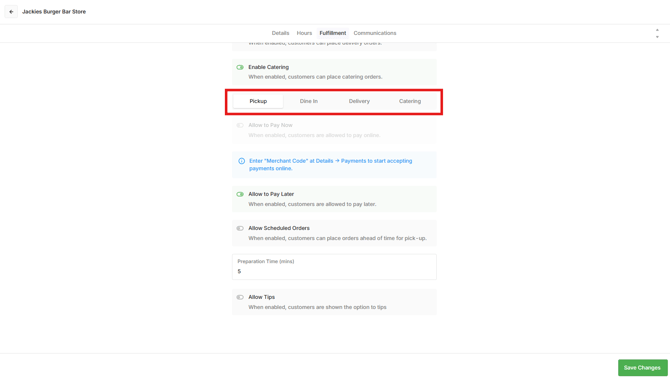
Enable each Order Type that should be available through the Online Store. After enabling an Order Type, open its tab to configure the required settings.
Step 3: Configure Order Type settings
Pickup:
-
Configure the required Pickup payment options:
- Allow to Pay Now: Customers can pay online when placing the order.
- Allow to Pay Later: Customers can place the order online and pay at the venue.
- Enable Allow Scheduled Orders to allow customers to place future Pickup orders.
-
When scheduled orders are enabled, configure:
-
Schedule Horizon: How many days in advance an order can be placed.
- Interval Duration: The time between available order slots.
- When scheduled orders are sent to POS.
- Release Time to POS: How many minutes before the scheduled collection time the order is sent to POS.
- For example, with a Release Time to POS of 60 minutes, an order scheduled for 7:00 pm is sent to POS at 6:00 pm.
-
-
- Set the Preparation Time so the customer knows when the order will be ready
- Enable Allow Tips and configure tip amounts if required
Dine In:
-
Configure the required Dine In payment options:
- Allow to Pay Now: Customers can pay online when placing the order.
- Allow to Pay Later: Customers can order online and pay at the venue.
-
Enable Table-Free Dine In Ordering to allow customers to place a Dine In order without entering a table number.
- Enable Allow Manual Table Number Entry to allow customers to enter their table number when placing a dine-in order.
- Set the Preparation Time so the customer knows when the order will be ready
- Enable Allow Tips and configure tip amounts if required
-
Enable Group Orders to allow customers at the same table to order and pay separately while having their orders consolidated for POS and kitchen preparation.
-
When Group Orders are enabled:
- Enable Auto Batching to automatically add all Dine In orders to the Group Order without prompting the customer.
- Set the Timer Duration. Orders placed by the group within the configured timer are grouped and sent together when the timer expires.
- Configure the customer-facing Prompt message.
- Configure the customer-facing Confirmation message.
- Configure the customer-facing Timer message.
-
For example, with an eight-minute timer, orders placed during those eight minutes are sent together at the end of the timer.
Important: Group Orders can only be enabled when Table-Free Dine In Ordering is disabled.
Delivery:
- See 🔗 Configure Delivery in Oolio Online Store for delivery settings.
Catering:
-
Catering is designed for larger orders that need to be placed in advance. Configure the rules that determine how far ahead customers can place Catering orders and when those orders are sent to the POS.
- Lead Time (days): Sets the minimum number of days in advance that a catering order must be placed. For example, a Lead Time of 3 prevents customers from selecting a fulfillment date fewer than three days away.
- Min. Order Amount ($): Sets the minimum cart value required to complete checkout. This amount is calculated after discounts and surcharges.
- Fulfillment Types: Select Pickup, Delivery, or both.
- Allow to Pay Now: Enable if customers can pay online
- Allow to Pay Later: Enable if customers can order online but pay in store
- Schedule Horizon: The maximum number of days in advance that a customer can place a Catering order.
- Interval Duration: Determines the increments between the fulfillment times displayed to customers, such as every 30 minutes.
- Send Scheduled Orders to POS: Determines when a scheduled order is released to the POS.
- Immediately: Sends the order to the POS as soon as the customer places it.
- Later: Sends the order to the POS based on the configured Release Delay.
- Release Delay: Determines how many minutes before the scheduled order time the order is sent to the POS. For example, with a 60-minute Release Delay, an order scheduled for 7:00 pm is sent to the POS at 6:00 pm.
Note: Using Later prevents future Catering orders from appearing on the KDS, printers, and Scheduled Orders tab until the configured release time.
See 🔗 Configure Catering for an Online Store for the full Catering configuration workflow.
Step 4: Configure customer notifications
SMS notifications can provide customers with order updates, including their receipt and estimated order due time after the Store accepts the order.
- Open Communications.
- Enable Order Updates and enable the Order Types that should send updates.
- Enable Allow Subscription to enable customers to subscribe to marketing campaigns during checkout.
- Select Save Changes.
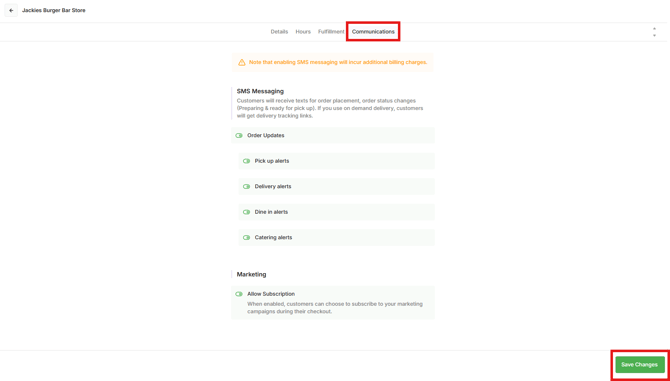
Important: SMS messaging may incur additional charges.
Step 5: Add the Online Store channel
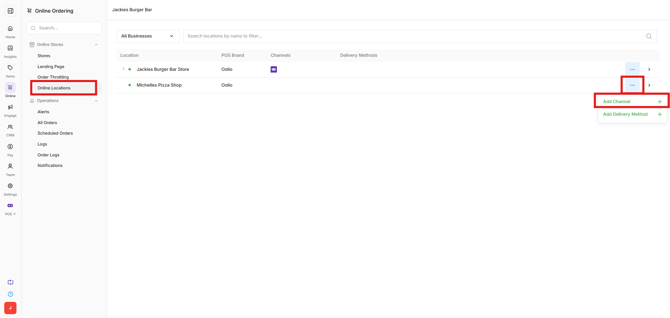
Connect the Online Store channel to the required Location.
- In Oolio One Back Office, open Online > Online Locations.
- Find the required Location and select the Options menu (⋯).
- Select Add Channel.
- For Partner, select Oolio Online Store.
- Select Confirm.
Step 6: Publish an Online Menu
An Online Menu must be published to the Online Store before customers can browse products and place orders.
See 🔗 Create and publish an Online Menu for instructions.
Step 7: Test the Online Store
Open the Online Store and complete a test order before making it available to customers.
-
Confirm that:
- The correct menu, products and prices are displayed.
- Store and fulfilment hours are correct.
- The required Pickup, Dine In, Delivery and Catering options are available.
- Scheduled ordering works as expected, where enabled.
- Payments, fees and surcharges apply correctly.
- The order is received correctly in POS.
- Customer notifications are received as expected, where enabled.
- Once testing is complete, the Online Store is ready for customers.