
An Online Menu controls the pages and products available for ordering through online ordering channels. Online Menus can be published to the Oolio Online Store or supported third-party ordering providers such as Uber Eats and DoorDash.
Pages can be created specifically for online ordering or existing pages from another menu can be reused. This makes it possible to share the same products across ordering channels or create different menu structures where required.
Oolio supports POS Menu, Kiosk Menu and Online Menu types. The steps below apply to Online Menu only.
Important: Pages can be shared across POS, Kiosk and Online menus. Changes to a shared page affect every menu that uses that page, so consider where a page is used before editing its products or configuration.
Before starting
Before creating an Online Menu:
- Create the products that need to be available for online ordering.
- Create the Standard Menu for POS if existing POS pages will be reused.
- Ensure the required online ordering channel or integration has been configured.
See 🔗 Create a product if the required products have not yet been created.
Step 1: Create the Online Menu
Create a separate menu for online ordering and select where it will be available.
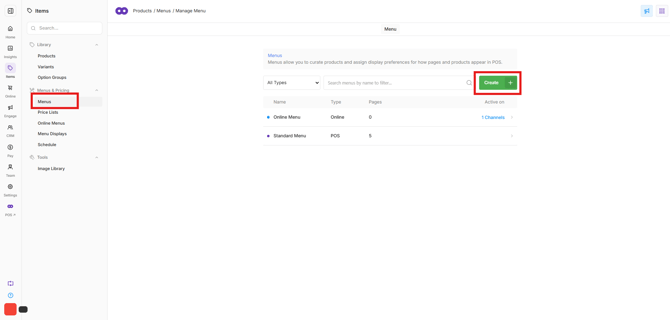
- Open Back Office > Items > Menus & Pricing > Menus.
- Select Create.
- Enter the Menu Name.
- Select Online Menu as the Type.
- Select the required venue or store.
- Select Confirm.
The new Online Menu is added to the Menus screen.
Step 2: Configure the Online Menu settings
Open the Online Menu settings and select which Order Types will use this menu.
- Find the newly created Online Menu.
- Select on the menu to open Menu Settings.
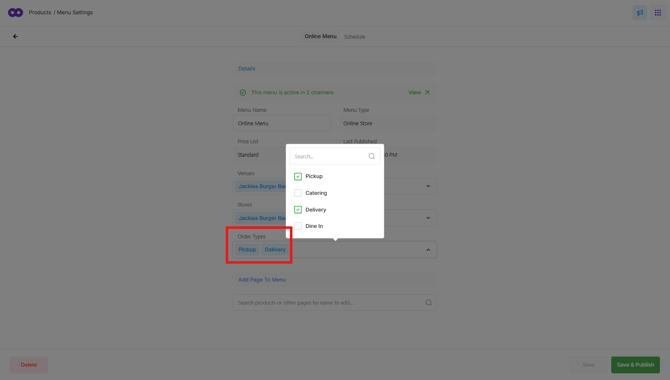
- Find Order Types below Stores.
- Select the Order Types that should use this Online Menu.
The selected Order Types determine when this menu is used. For example, different menus can be assigned to different Order Types where a different product offering is required.
Step 3: Add pages to the Online Menu
Pages determine how products are grouped and displayed through the online ordering channel. Add an existing page to share the same page across menus, or create a new page specifically for the Online Menu.
Add an existing page:
-
Existing pages can be reused when the Online Menu requires the same Products or Categories as another menu, such as the POS menu.
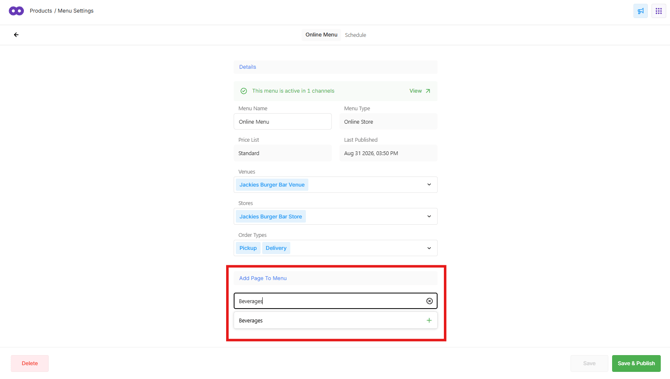
- Find Add Page To Menu.
- Select the search field.
- Begin entering the name of an existing page.
- Select the required page.
- Repeat for any additional pages.
-
Adding an existing page also adds the products already included on that page to the Online Menu.
-
Select the pencil icon beside a page to open Page Detail and review the products and Categories assigned to it.
Important: Pages are shared between menus. Editing a page that is also used by another menu changes that page everywhere it is used.
Create a new page:
-
Create a new page when a different group of Products or Categories is required for the Online Menu.
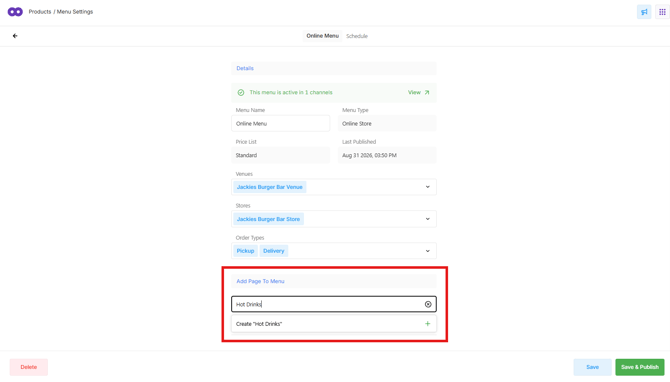
- Find Add Page To Menu.
- Select the search field.
- Enter the name of the new page.
- Create the new page.
-
The Page Detail screen opens.
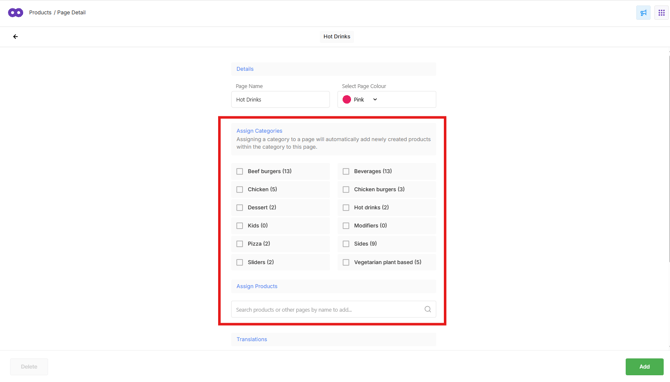
- Add the required individual Products or Categories to the page.
- Repeat to create any additional pages required.
Adding a Category populates the page with products assigned to that Category. New products added to the Category are also automatically added to the page.
Once all required pages have been added, arrange them in the required order and select Save.
Step 4: Set the Online Menu schedule
The Menu Schedule controls when the menu is available for online ordering. How the schedule is used depends on the online ordering channel:
- Uber Eats and DoorDash: The Menu Schedule controls when the store is open and available to accept orders.
- Oolio Online Store: The Menu Schedule controls when the menu is available to order from. The store's Opening Hours, configured separately in the Online Store settings, control when the store itself is open.
For the Oolio Online Store, consider whether pre-orders are accepted when setting the Menu Schedule. If customers need to place orders in advance while the store is closed, the menu must be scheduled as available during the time the pre-order is being placed.
To configure the Menu Schedule:
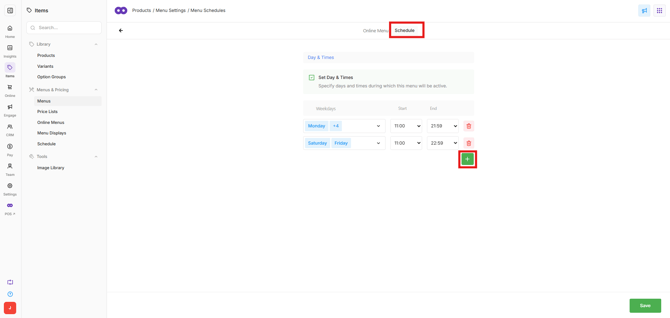
- Select Schedule at the top of the menu settings screen.
- Select the + button to add a schedule.
- Select All Days to choose the days when the menu should be available.
- Adjust the start and end times.
- To set different hours for different days, select the green + icon to add another set of days and times. For example, weekdays can use one set of hours while weekends use another.
- Repeat as required, then select Save.
Step 5: Save and publish the Online Menu
After confirming the pages, products and schedule, publish the menu to the required online ordering channel.
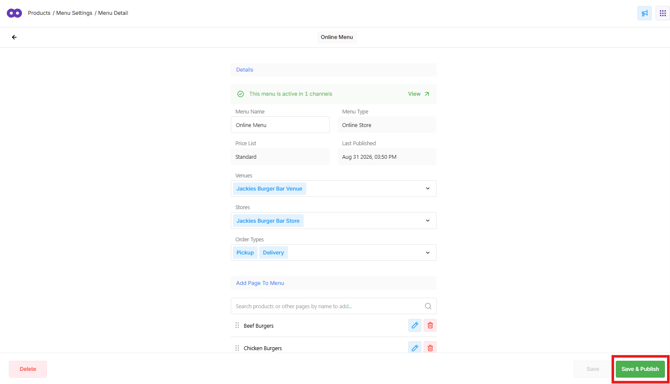
- Select Online Menu at the top of the screen to return to the menu settings.
- Select Save & Publish.
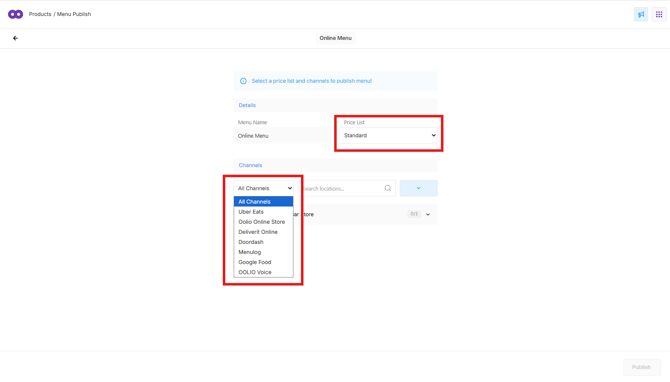
The Menu Publish screen opens. This is where the online ordering Channel and Price List are selected.
- Select the All Channels dropdown.
- Select the required online ordering channel, such as Oolio Online Store, Uber Eats or DoorDash.
- Select the required Price List.
- Select the checkbox beside the required store.
- Select Publish.
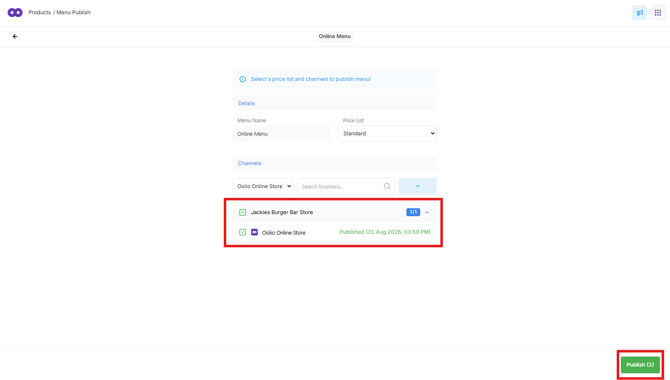
The Online Menu is now published to the selected online ordering channel.