
Products are the items sold through Oolio One and can appear on POS, Kiosk and online ordering channels. Products are created in Back Office and can include pricing, availability, dietary information, variants and ordering options to control how the item is sold across different channels.
Before starting
Some product settings rely on other items being configured first. Where required, set up the following before creating the product:
- Categories to organise products.
- Variants if the product is sold in different variations.
- Option Groups and Modifiers if customers need to make selections or customise the product.
These are not required for every product, but setting them up first can make product configuration easier.
Step 1: Create the product
Start by creating the base product and entering the information used to identify and organise it.
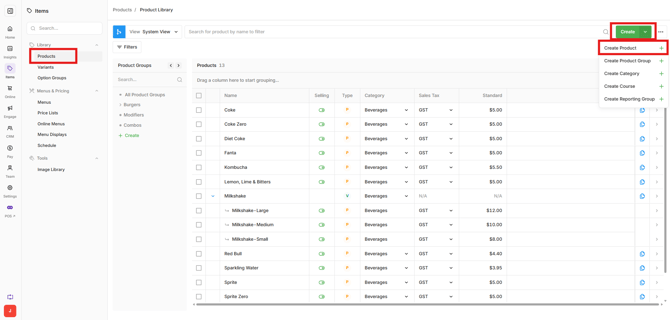
- Open Back Office > Items > Products.
- Select Create.
- Select Standard Product.
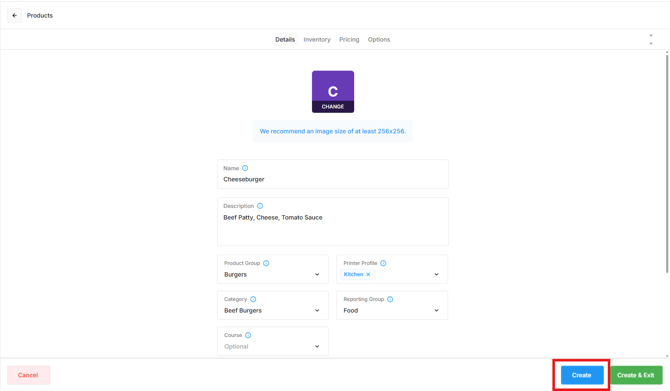
- Complete the required product information:
- Name: The product name displayed on POS, Kiosk and online ordering.
- Description: Additional information about the product, typically displayed on Kiosk and online ordering.
- Product Group: The top-level structure used to organise products within the product library.
- Printer Profile: Determines where the product prints by assigning it to a configured printer routing profile.
- Category: Groups similar products together to help organise and display them in menus.
- Reporting Group: Groups the product for reporting. Products without a Reporting Group are assigned to Other.
- Select Create.
The product is created and can now be configured with additional details, inventory settings, pricing and ordering options.
Step 2: Configure product details
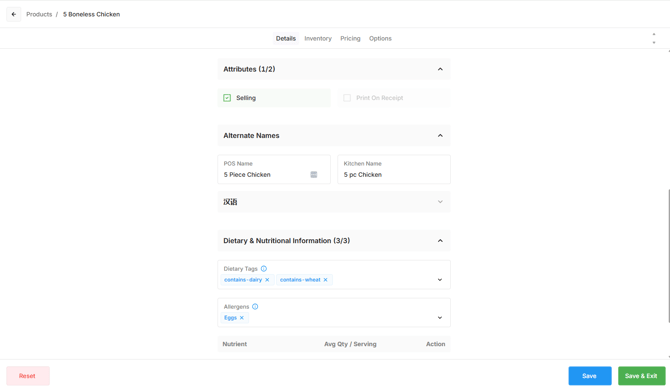
Open the Details tab to control how the product appears and behaves across POS, online ordering and kitchen workflows.
Attributes:
-
Use Selling to control whether the product is available in the front end.
-
Enable Selling to make the product visible.
-
Disable Selling to hide the product.
-
Alternate Names:
-
Alternate names allow different product names to be displayed where shorter or more practical wording is useful.
-
POS Name: An alternate product name displayed on POS to make the item easier for staff to identify.
-
Kitchen Name: An alternate, shortened product name used on preparation dockets to make the item easier for kitchen staff to identify.
-
Dietary & Nutritional Information:
-
Add dietary, allergen and nutritional information where required.
-
Dietary Tags: Identify dietary attributes such as vegan or gluten free. Dietary Tags are displayed with the product on POS and the online store.
-
Allergens: Identify allergens contained in the product. Allergens are displayed with the product on POS and the online store, and products can be filtered by allergen on POS.
-
Nutrient information: Add nutritional information where required. This information is displayed with the product on POS.
-
-
After completing the required settings, select Save.
Step 3: Configure inventory
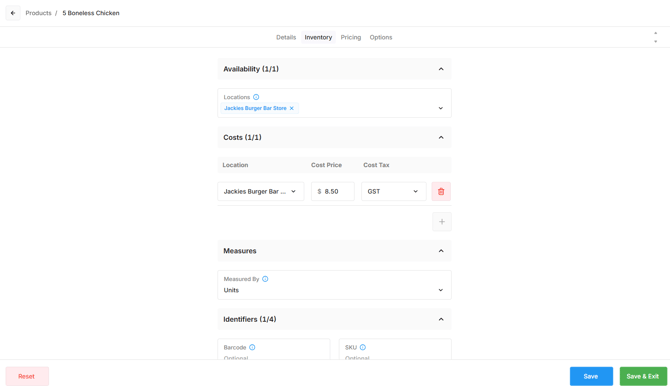
Open the Inventory tab to control where the product is available and add cost, measurement and identification information.
Availability:
-
Use Locations to select the locations where the product is available for sale.
Costs:
-
Enter the cost to produce or purchase the product.
-
Cost Price and Cost Tax can be configured for each location and are used for reporting and margin calculations.
Measures:
-
Use Measured By to specify how the product is sold, such as by:
-
unit
-
weight
-
volume
-
Identifiers:
-
Add identifiers used to recognise or track the product.
-
Barcode: Scan or enter the product's barcode to allow the product to be ordered by scanning it on POS.
-
SKU: An optional unique code used to identify or track the product.
-
PLU: A product identification code that is set automatically.
-
GTIN: An optional unique code used to identify or track the product.
-
Recipe:
-
Add recipe notes where required. Recipes can be viewed and printed from POS for staff reference.
-
Select Save after completing the required Inventory settings.
Step 4: Configure pricing and variants
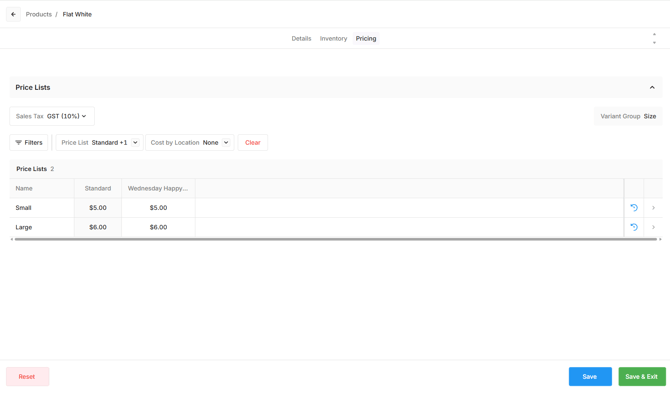
Open the Pricing tab to set the product's sales tax and selling price. Variants can also be added when the product is sold in different variations, such as different sizes.
Important: Variants must first be created in the Variants page before they can be assigned to a product.
- Open the Pricing tab.
- Select the required Sales Tax code.
- Enter the standard price.
- Use the Price List filters to display and enter other prices where required.
- Add a Variant Group if the product uses Variants.
- Enter the required price for each Variant.
- Select Save.
For example, Variants could be used for different drink sizes or serving types:
- Cup
- Mug
- Takeaway Small
- Takeaway Large
Step 5: Add Option Groups
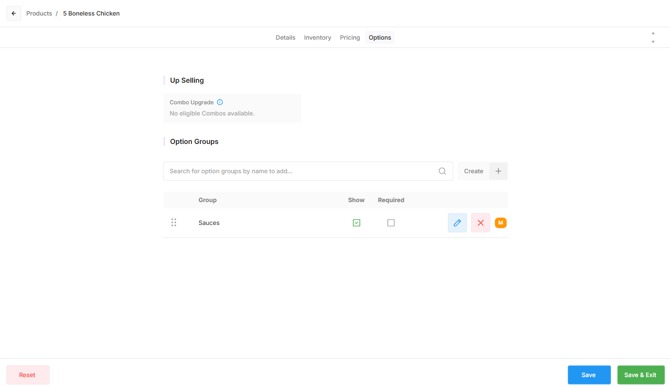
Option Groups allow customers to make selections or customise a product when ordering. For example, a product could include options for milk type, extra sauces or side choices.
Important: Option Groups and Modifiers must be created before they can be attached to a product.
- Open the Options tab.
- Search for the required Option Group.
- Select the Option Group to add it to the product.
- Select Show if the Option Group should prompt when the product is ordered.
- Select Required if a selection must be made when the product is ordered.
- Select the pencil icon if the Option Group settings need to be changed for this product.
- Adjust the required settings:
- Selections Min, Max and per Group: Control how many options can be selected for the product.
- Add On Price: Enter a different additional price when the price for this product should differ from the price configured on the Modifier.
- Default: Set Modifiers as default selections where required.
- Select Save.
Settings inherited from the Option Group can be overridden for an individual product. This allows the same Option Group to behave differently depending on the product it is attached to.
Step 6: Review the product
Review the product after completing the required setup to confirm its settings are correct.
- Open Items > Products.
- Select the product.
- Review the Details, Inventory, Pricing and Options settings.
- Confirm any Variants and Option Groups have been added correctly.
- Confirm Selling is enabled if the product should be visible in the front end.
- Test the product on POS if required.