
A POS Menu controls how pages and products are organised in Oolio One POS, helping staff quickly find products during service. Pages can be used to group related products, with products added individually or by category and arranged to suit the venue's workflow.
Oolio supports POS Menu, Kiosk Menu and Online Menu types. The steps below apply to POS Menu only.
Before starting
Before building the POS Menu:
- Create the products that need to appear on the menu.
- Where possible, organise products into Categories first.
- Categories can be added directly to menu pages and help keep the menu up to date as products are added to those Categories.
See 🔗 Create a product if the required products have not yet been created.
Open the POS Menu
Oolio provides a Standard Menu that can be used as the starting point for the POS layout.
- Open Back Office > Items > Menu & Pricing > Menus.
- Find the Standard Menu.
- Select on Standard Menu to open its settings.
- Select the Venues and Stores where the menu should be available.
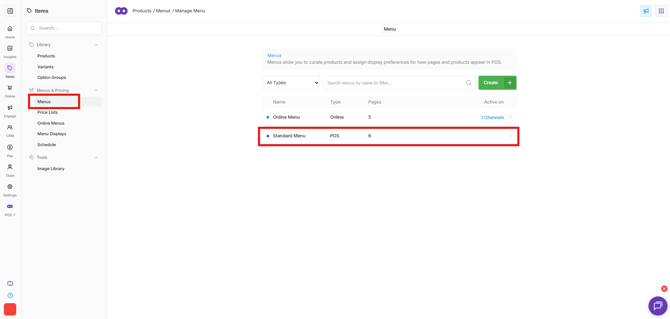
There are two ways to create and manage pages within the Standard Menu:
- Create pages from the Menu Settings.
- Build pages visually from Menu Layout.
Method 1: Create pages from Menu Settings
Pages group products together and appear as navigation options in POS. Pages are often named after product categories, but can use any name that suits the venue's menu structure.
Step 1: Create a page
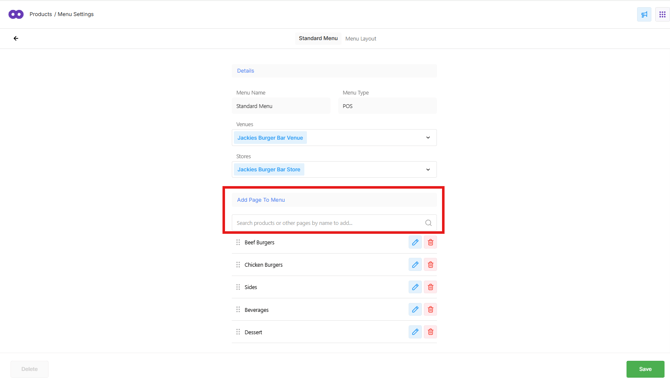
- Find Add Page to Menu on the Standard Menu details screen.
- Select the search field.
- Enter the name of the page to create.
- Create the new page.
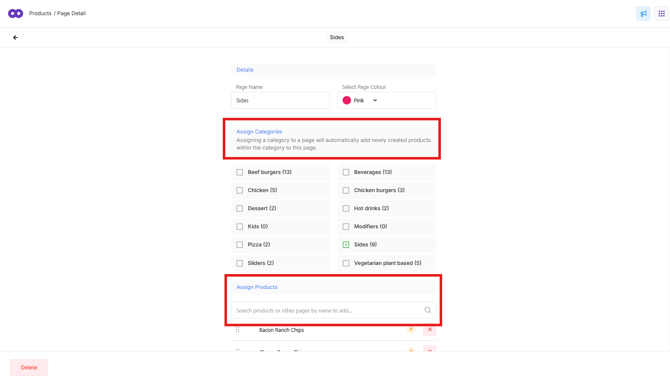
 The Page Detail screen opens. Select Categories or search for Products or other Pages to determine which products appear on the page.
Note: Adding a Category can make the POS Menu easier to maintain. When a new product is added to that Category, a product tile is automatically added to the corresponding POS page.
Step 2: Create and arrange the remaining pages
Repeat the process until all required pages have been created.
To change the order of the pages, select and hold a page, then drag it to the required position.
Select Save when finished.
Each page created from the Menu Settings also creates a corresponding page tile under Menu Layout. Products or Categories assigned to the page are also populated in the layout.
Step 3: Edit the Menu Layout
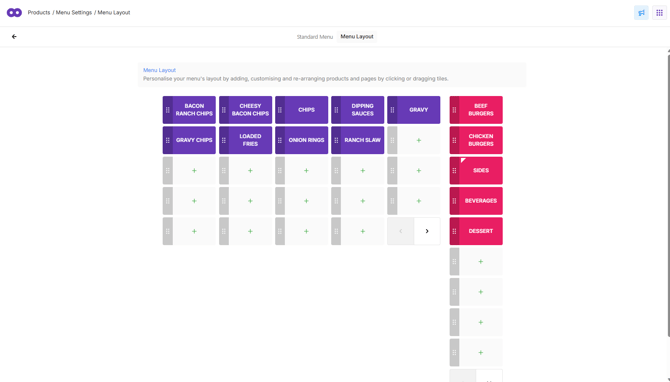
Menu Layout provides a visual representation of how the menu appears in POS. Use it to rearrange page and product tiles into the preferred positions and change tile colours to make different areas of the menu easier for staff to identify.
Page and product tiles use Deep Purple by default. Select a tile to choose a different colour, or select and hold a tile and drag it to a new position.
Select Save after making changes to the Menu Layout.
Method 2: Build pages from Menu Layout
Menu Layout provides a visual representation of how the menu appears in POS. Page buttons appear down the right-hand side, while products appear in the centre of the layout.
Step 1: Add pages to the layout
- From the Standard Menu details screen, select Menu Layout.
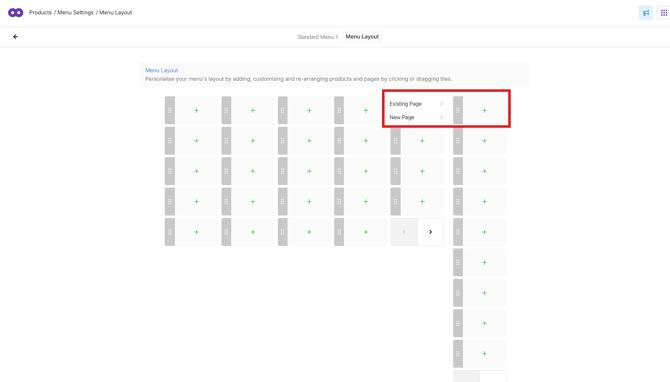
- Select the first + in the Pages column.
- Select Add Existing Page or Add New Page.
- If adding an existing page, select the required page.
- If creating a new page, enter the page name and select its colour.
- Repeat until all required pages have been added.
- Select Save.
Step 2: Add products to a page
Products can be added individually or by Category. Pages can also be added within another page to create additional levels of navigation.
For example, a Beer & Wine page could contain separate pages for Tap Beer, Bottled Beer, Red, White and Sparkling Wine.
- Select the required page.
- Select View Page.
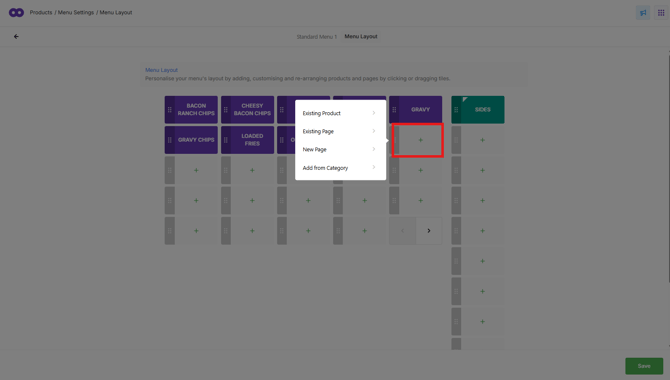
- Select an empty product position in the layout.
- Choose whether to add:
- a Category
- an individual product
- another page
- Select the required Category, product or page.
- Repeat as required.
Adding a Category automatically populates the page with products assigned to that Category.
Step 3: Change product tile colours
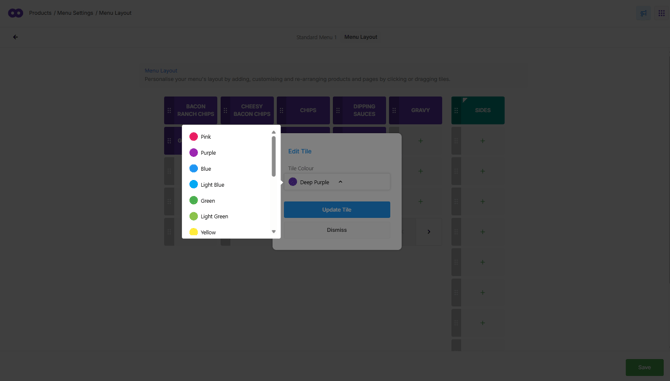
- Select the required product tile.
- Select Edit Tile.
- Choose the required colour.
- Select Update Tile.
- Repeat for other product tiles as required.
- Select Save before moving to another page.
Step 4: Rearrange pages and products
Select and hold a page or product tile, then drag it to the required position.
Repeat for other tiles as required and select Save.
Important: Select Save before moving to another page or area of the Menu Layout to retain the changes.
Sync the menu to POS
After the pages and products have been added and arranged:
- Select Save in Back Office.
- Log in to Oolio One POS.
- Select Sync Menu.
The updated POS Menu is now available on the POS.