Oolio mPOS provides a compact version of Oolio One POS for taking orders while moving around the venue. It is particularly useful for table service, allowing staff to take orders and, when configured with a compatible payment terminal, process payments without returning to the main POS.
Each mPOS uses a Device Profile and Device configured in Oolio One Back Office to control its menu, sections, workflow, payment and printing settings.
Before starting
Complete the Back Office configuration from a POS or computer, rather than from the mPOS device.
Make sure the following are ready before setting up mPOS.
- The Sections the mPOS should access have been configured if Dine In is required.
- Payment terminal details are available if the mPOS will be used to process payments.
- Any required Printers and Printer Templates have been configured.
Step 1: Create an mPOS Device Profile
The Device Profile controls how the mPOS operates, including its Store, Sections, workflow and other device settings.
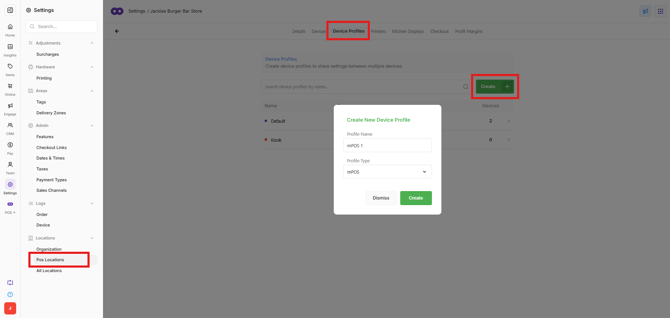
- In Oolio One Back Office, open Settings > Locations and select the Store where the mPOS will be used.
- Open Device Profiles.
- Select Create.
- Enter a Profile Name that clearly identifies the profile, such as
mPOS. - For Profile Type, select mPOS.
- Select Create.
Step 2: Configure the mPOS Device Profile
Most mPOS Device Profile settings are configured in the same way as other Oolio One devices. See 🔗 Configure Device Profile settings for information on configuring Menus, Price Lists, Order Types, Sections, receipt printing and other standard settings.
For mPOS, review the following settings:
Details:
-
Under Details, select how the mPOS will be used:
- Taking Orders: Displays the menu and allows staff to place orders. Payments can also be processed from the mPOS when a compatible payment device is configured.
- Pay at Table: Used to retrieve an existing order or bill from POS and take payment from the mPOS. The menu is not displayed and new orders cannot be placed.
Floor View:
-
If Taking Orders is selected and the mPOS will be used for table service, open Options and enable Enable Floor View to allow staff to select tables from the Floor Plan.
Select Save after configuring the Device Profile.
Step 3: Create the mPOS Device
Each physical mPOS used at the venue needs its own Device configuration.
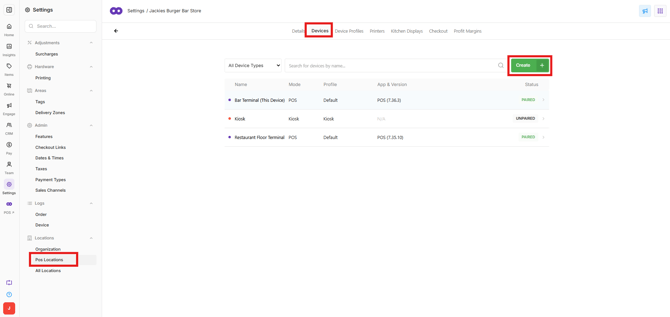
- In Oolio One Back Office, open Settings > Locations and select the required Store.
- Open Devices.
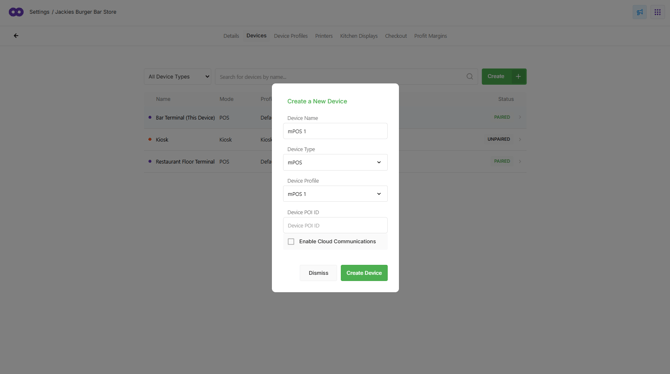
- Select Create.
- Enter a Device Name that clearly identifies the device, such as
mPOS 1. - For Device Type, select mPOS.
- Select the mPOS Device Profile created earlier.
- If a payment terminal will be linked to the mPOS, enter its identifier under Device POI ID.
-
The required format is:
{Model Name}-000{Serial Number}For example, an S1F2 terminal with serial number
158213603358would use:S1F2-000158213603358See Set up Payment Terminals for information about linking other supported terminal models.
-
- Enable Cloud Communications if mPOS should send payment requests via the cloud rather than directly to the payment terminal over the venue’s local network.
- Create the Device.
Step 4: Configure other settings
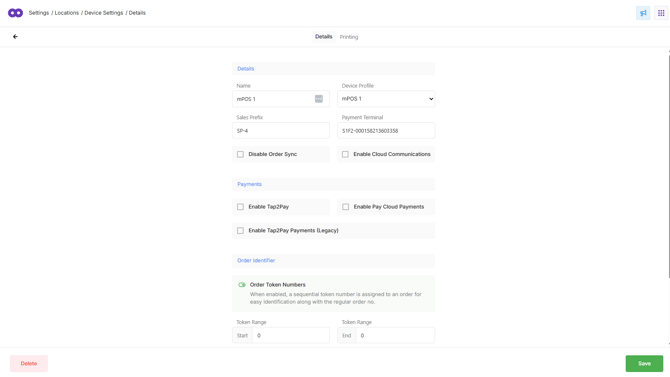
Open the mPOS Device and configure any additional settings required for how the device will operate.
- Sales Prefix: Set the prefix used for sales created from the mPOS.
- Disable Order Sync: Enable to prevent orders from syncing between the mPOS and POS.
- Enable Tap2Pay: Enable when Tap2Pay will be used to process payments directly from the supported mPOS device.
- Enable Pay Cloud Payments: Enable to process payment transactions using Cloud Communications.
- Order Token Numbers: Enable to assign each order a sequential token number in addition to its regular order number, making orders easier to identify.
Step 5: Configure printing
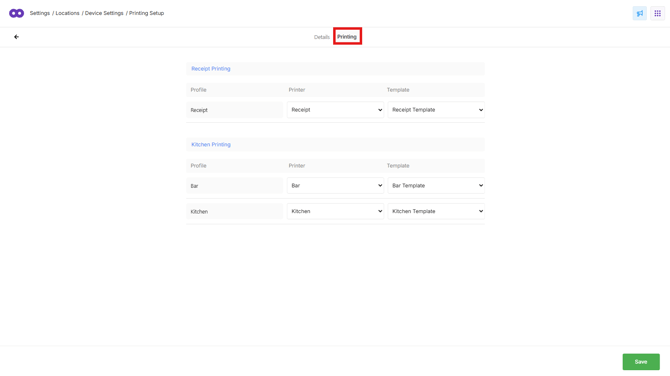
Configure where receipts and other required print jobs from the mPOS are sent.
- In Oolio One Back Office, open Settings > Locations and select the required Store.
- Open Devices and select the mPOS Device.
- Open Printing.
- Assign the required Printers and Printer Templates.
- Save the changes.
See 🔗 Set up Printers for more information about configuring printers.
Step 6: Open Oolio mPOS
Open mPOS directly on the device that will be used by staff.
The Oolio mPOS app is pre-installed on supplied mPOS devices. When using a supported personal device, install Oolio mPOS from the appropriate app store.
When the app is opened and ready to be connected, a QR code is displayed.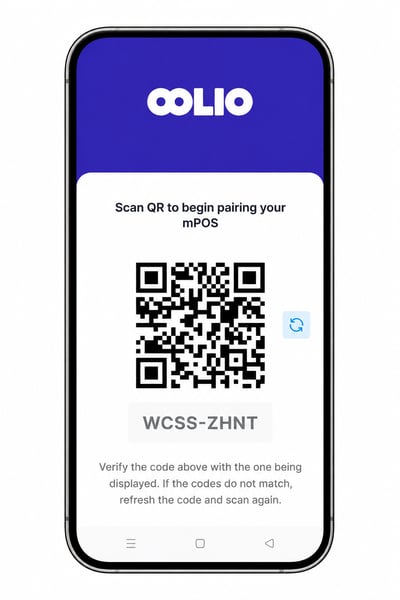
Step 7: Connect and authenticate the mPOS
Use a mobile device with a camera to authenticate the mPOS.
- Scan the QR code displayed on the mPOS using the mobile device.
- Open the auth.oolio.io link when prompted.
- Compare the eight-digit code displayed on the mobile device with the code shown on the mPOS.
- If the codes match, confirm the connection.
- Wait for the confirmation message to appear on the mobile device.
- Return to the mPOS.
- If multiple Stores are available, select the required Store.
- Select the mPOS Device created earlier.
The mPOS is now authenticated and loads the configuration associated with the selected Device.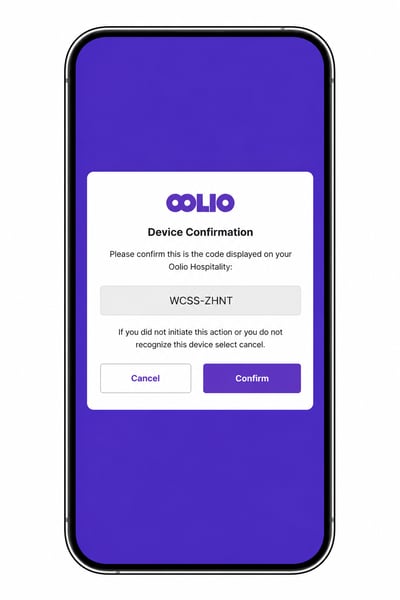
Step 8: Test the mPOS
Complete an end-to-end test before using the mPOS during service.
Place a test order and confirm:
- The correct Store, Menu and Order Types are available.
- The required Sections and tables can be accessed.
- Products can be added and an order can be placed successfully.
- The configured payment terminal can process a payment, if applicable.
- Receipts and other required print jobs are sent to the correct printers.
Once testing is complete, the mPOS is ready for use.