
Device Profiles control how POS devices operate in Oolio One POS and are configured in Oolio One Back Office. A Device Profile can be shared across multiple POS devices or tablets, or different profiles can be created when devices require different menus, workflows, sections, Order Types, printing behaviour or other settings.
For example, a Bar POS may only need snacks and drinks with quick access to Takeaway orders, while a Restaurant POS may open directly to the Floor Plan. A POS in a function room could use different sections and Seat Management to support larger groups.
Open a Device Profile
In Oolio One Back Office:
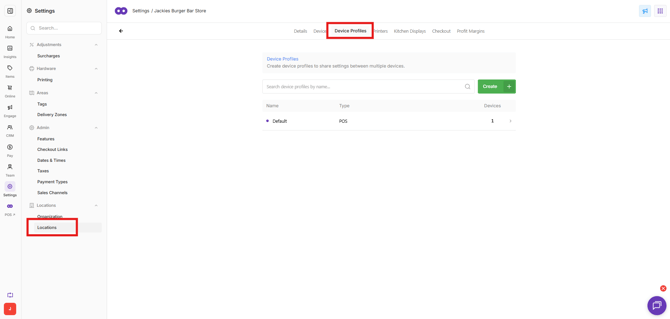
- Open Settings > Locations.
- Select the required Venue.
- Select an existing Device Profile to edit, or create a new Device Profile.
The settings available within the Device Profile control how POS devices assigned to that profile behave.
Details
Use Details to configure the main settings for the Device Profile.
Profile Name:
-
Enter a name that clearly identifies where or how the profile is used. For example, POS Restaurant or Bar POS.
Function Map:
-
Leave Function Map as Default when using the standard POS configuration.
Select Menu:
-
Select the menu available on devices using this profile.
-
Different Device Profiles can use different menus. For example, a Bar POS could use a menu containing only drinks and bar snacks.
Price List:
-
Select the Price List that should apply to the profile.
-
The standard option can be retained when pricing such as Happy Hour is applied separately.
-
A specific Price List can also be selected when the POS should only use that pricing.
Assigned Store:
-
Select the stores where this Device Profile will be used.
Assigned Section:
-
For venues using sections and tables, select which sections should be available to the Device Profile.
-
The profile can display:
-
- All sections in the Floor Plan.
- Selected sections only, such as showing the Courtyard on a Bar POS.
Set as a Default Profile:
-
Enable Set as a Default Profile for the profile that should be used as the default.
Preferences:
-
Enable Show Order Name for Takeaway & Other Orders to display a prompt in the POS when Pay Now or Send is selected for orders other than Dine In.
-
The order name can be used for information such as:
-
A customer's name, allowing staff to call the name when the order is ready.
-
A table number sign provided to a customer.
-
-
The order name will appear on the docket and in Open Orders.
-
Enable Show Guest Count Prompt for Dine In to prompt for the number of guests to be entered when a table is selected from the Floor Plan.
-
This guest count is also required when using Seat Management to assign products to individual guests.
Order Types:
-
Select the order types used by the venue and choose the required default order type.
-
For example:
- Dine In can be used as the default for restaurant service.
- Takeaway can be used as the default for bar or counter service.
-
The selected default is used when taking new orders.
Barcode Scanning Mode:
-
Toggle on to allow a barcode to be scanned in the POS for adding products or customers to an order
Options
Use the available Device Profile Options to control which POS functions are available.
Seat Management:
-
Enable Seat Management to assign products to individual seats or guests after selecting a table and entering the guest count.
Important: Seat Management requires a Floor Plan with sections and tables.
Cash Management:
-
Enable Cash Management to use Money In and Money Out events such as:
- Withdraw Tips
- Petty Cash
- Float
- These events can be used when managing cash during a shift.
Enable Floor View:
-
Enable Floor View to provide access to the Floor Plan and its sections and tables from the POS.
Enable Online Orders:
-
For venues using an Online Store or QR ordering, enable Online Orders to access online orders from the POS.
Enable Courses:
-
For venues that need items such as starters, mains, and desserts to be managed and printed according to their course, enable the required course functionality. Courses should be enabled under Features and then created under Products.
Printing Options:
Device Profiles can control what happens to receipts after payment.
Print Receipts Automatically:
-
Select Print Receipts Automatically to print the receipt when payment has been taken and Complete Sale is selected.
Prompt for Print / Email Receipts:
-
Select Prompt for Print / Email Receipts to display receipt options after payment instead of printing automatically.
-
The prompt provides options in the POS to:
- Send the receipt to the customer by email or SMS.
- Select Print Order to print the receipt.
- Select New Sale to continue without printing.
Do Not Print or Prompt:
-
Select Do Not Print or Prompt when no receipt prompt should appear automatically after payment.
-
Receipts can still be printed later from Order History.
Printing Features:
Additional options can control information and functionality associated with printers and receipts.
Include Printer Profile in Docket:
-
Enable Include Printer Profile in Docket to include the profile information on the docket.
Enable QR Printing:
-
Enable QR Printing to add a QR code to the receipt that customers can scan using their phone to load their order and payment information.
Enable Kitchen Buzzer:
-
Enable Kitchen Buzzer when a compatible kitchen buzzer accessory has been added to the printer. The buzzer provides an audible alert when an order is printed.
Workflow
Workflow settings determine which screens operators see during common POS actions.
Screen After Order Placed:
-
Select the screen that should appear after an order is sent or paid.
-
For example, Login or Floor View can be used to return restaurant staff to the appropriate starting screen after completing an order.
Default Sales Screen:
-
Select the screen that should appear by default after an operator logs in.
-
Choose the screen that best matches how the device is used during service.
-
For example, a restaurant POS may use Floor View when staff generally begin orders by selecting a table.
The device profile is now created and ready to assign to a device.