
Customer Accounts allow customers, businesses or other account holders to charge purchases to an account instead of paying for each order immediately. This can be useful for any customer that has an agreed arrangement to purchase On Account and settle the outstanding balance later.
Default order and credit limits can be configured in Oolio One Back Office, with different limits applied to individual Customer Accounts where required.
Once enabled, On Account becomes available as a Payment Type in Oolio One POS for customers with an active account.
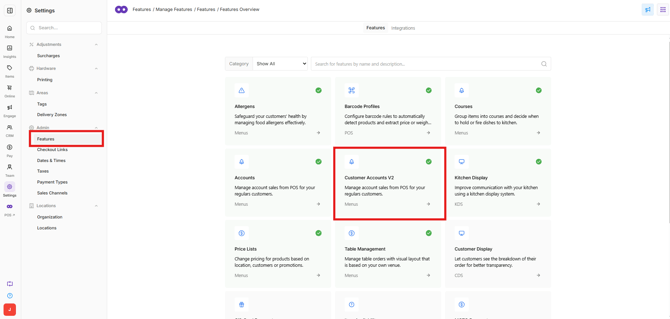
Step 1: Enable Customer Accounts
- Open Back Office > Features > Customer Accounts.
- Select Enable.
Step 2: Configure Customer Account settings
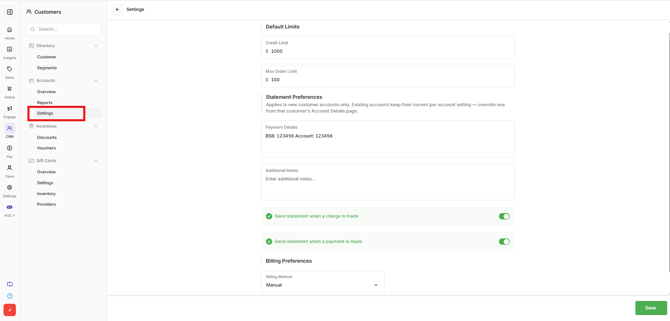
Configure the default account limits, statement information and billing preferences used for Customer Accounts.
- Open Back Office > CRM > Accounts > Settings.
- Configure the required settings.
Default Limits:
-
Credit Limit
-
Set the default maximum outstanding balance allowed on a Customer Account.
-
This value can be overridden when creating an individual Customer Account.
-
-
Max Order Limit
-
Set the default maximum amount that can be charged On Account in a single order.
-
This value can also be overridden for individual Customer Accounts.
-
Statement Preferences:
-
Add the business Payment Details that should be included on customer statements. These details provide customers with the information required to pay their outstanding account balance.
- Add an Additional Note to print on the statement if required.
-
Configure when statements should be sent following account activity:
-
Send statement when a charge is made: Sends a statement when a new charge is added to the Customer Account.
-
Send statement when a payment is made: Sends a statement when a payment is recorded against the Customer Account.
-
Billing Preferences:
-
Choose how account statements are sent:
-
Manual: Statements are sent manually when required.
-
Automatic: Statements are sent automatically according to a configured schedule.
-
-
When Automatic is selected, configure:
-
Payment Frequency: Select Weekly, Monthly or Quarterly to determine how often statements are sent.
-
Start Date: Select the date from which the automatic statement schedule begins.
-
Step 3: Create a Customer Account
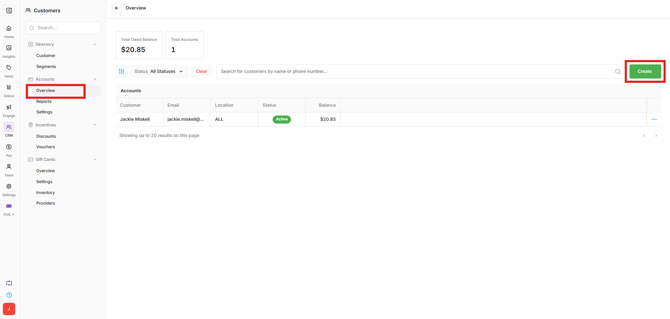
- Open Back Office > CRM > Accounts > Overview.
- Select Create.
- Search for the required customer.
- Select Enable beside the customer.
- If required, override the default Credit Limit or Max Order Limit for the account.
- Select Create Account.
The Accounts screen displays existing Customer Accounts and their outstanding balances, along with the total balance owed across accounts.
Note: Customer Accounts cannot currently be enabled directly from POS. Create and configure the account in Back Office.
Step 4: View and edit Customer Accounts
Existing Customer Accounts can be reviewed and managed from the Accounts Overview.
- Open Back Office > CRM > Accounts > Overview.
- Find the required customer.
- Select the Options menu (⋯) on the customer.
- Choose the required action.
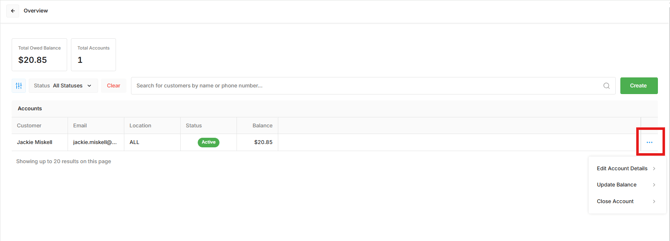
Edit Account Details:
-
Select Edit Account Details to view or change the account configuration, including:
- Credit Limit
- Max Order Limit
- Statement Preferences
- Billing Preferences
View account transactions and send statements:
-
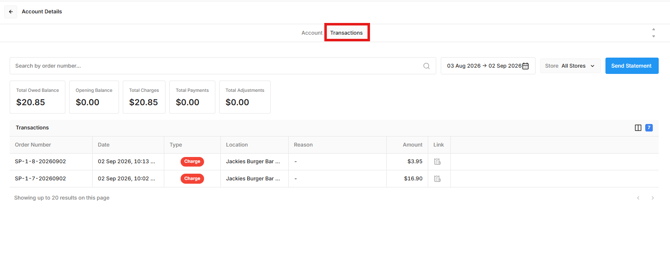
Open the Transactions tab to review the charges, payments and adjustments that make up the Customer Account balance.
-
The account summary displays:
- Total Balance Owed: The current outstanding balance on the account.
- Total Charges: The total value of charges made to the account.
- Total Payments: The total value of payments recorded against the account.
- Total Adjustments: The total value of manual adjustments made to the account balance.
-
The transaction history provides a record of individual activity on the account. For transactions associated with an order, the Order Number is displayed. Select the receipt icon beside the transaction to view the associated order and its details.
-
Select Send Statement to manually send the current account statement to the customer. This can be used when a statement needs to be sent outside the configured automatic statement schedule or when the account uses manual billing.
Update Balance:
-
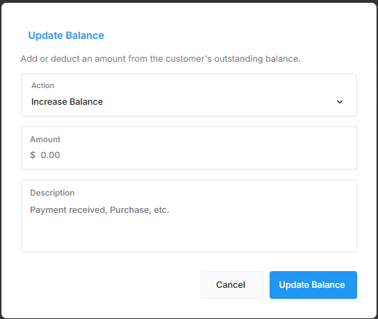
Select Update Balance to manually adjust the outstanding balance on the Customer Account.
-
The balance can be:
- Increased to add an amount to the outstanding balance.
- Decreased to reduce the outstanding balance.
Close Account:
-
Select Close Account when the customer should no longer be able to make purchases using the account.
Use Customer Accounts in POS
After Customer Accounts has been enabled and an account has been created for the customer, purchases can be charged to the account from Oolio One POS.
See 🔗 Use Accounts in POS for the POS workflow.