
A single image can be processed for use across Oolio One, removing the need to maintain separate copies of the same product image for different channels.
Before starting
Before uploading images:
- Prepare images in JPG, PNG or WEBP format.
- Keep image file sizes reasonable. Very large files may be compressed or flagged during processing.
- Where possible, name image files to match the corresponding product. This can help improve the AI-assisted product suggestions.
- Upload up to 100 images in each batch. Split larger collections across multiple uploads.
Step 1: Open the Image Library
Open Back Office > Items > Image Library.
The Image Library contains uploaded images and provides options to upload, search, replace and remove images.
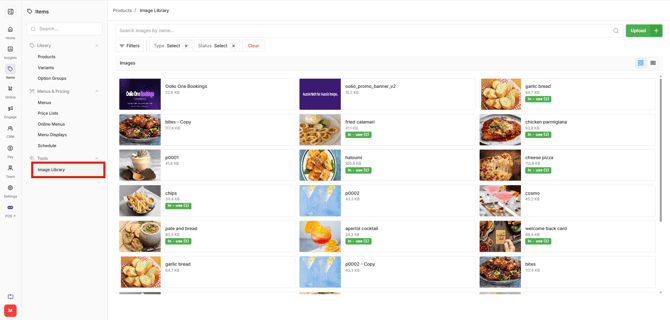
Step 2: Start an image upload
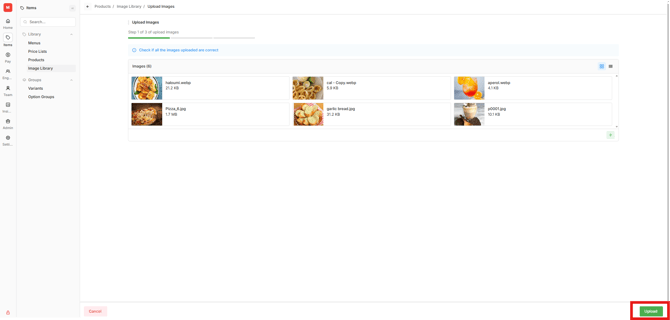
- Select Upload from the Image Library.
- Use the device's file explorer to locate the required images.
- Select one or more images.
- Select Open.
The selected images appear in Back Office ready to be uploaded.
When selecting multiple files on a Windows device, hold Ctrl while selecting each required file.
To make changes before uploading:
- Hover over an image and select the bin icon to remove it from the upload.
- Select the green + to add more images.
- Review the selected images.
- Select Upload.
The images begin processing. It is not necessary to remain on the upload screen while processing takes place.
Step 3: Review the image suggestions
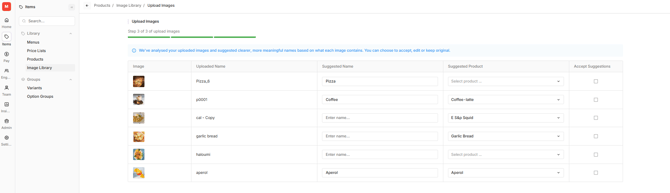
After processing, review the list of uploaded images before confirming how they should be stored and assigned.
The list includes:
- Image: A preview of the uploaded image.
- Uploaded Name: The original filename.
- Suggested Name: An AI-assisted suggestion for the name used to store the image in Oolio One.
-
Suggested Product identifies an existing product that the image may belong to. If the suggested product is correct, keep the selection. If the suggested product is incorrect:
- Open the product dropdown.
- Search for and select the correct product or products.
- Accept Suggestions: Confirms the selections for that image.
Review each image rather than accepting a suggestion without checking that the correct product has been selected.
Step 4: Confirm the upload
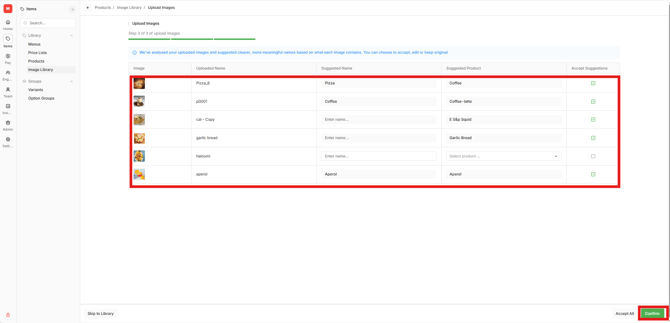
Review all images and their product assignments before completing the upload.
- Check the image names.
- Check the selected products.
- Confirm the required suggestions have been accepted.
- Select Confirm.
The images are added to the Image Library and the confirmed product assignments are applied.
Replace a product image
An existing image can be replaced from the Image Library when a new version is required.
- Open Back Office > Items > Image Library.
- Find the image to replace.
- Hover over the right-hand corner of the image.
- Select the edit pencil.
- Select Change.
- Find the replacement image using the device's file explorer.
- Select the image and select Open.
- Select Save.
The replacement image is applied to the devices where the product is available.
Remove a product image
Images can also be removed from the Image Library.
- Open Back Office > Items > Image Library.
- Find the image to remove.
- Hover over the right-hand corner of the image.
- Select the bin icon.
If the image is currently in use, Back Office displays a message indicating that the image is being used. If the image is not in use, a different removal confirmation is displayed.
Review the message before continuing.
Find and view images
The Image Library provides different ways to find and review uploaded images.
Use:
- Grid or List to change how images are displayed.
- Search to find a specific image.
- The Used filter to show only images currently in use.