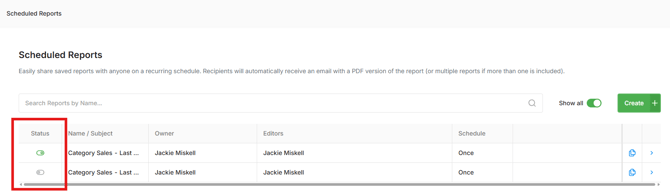
Reports in Oolio One Back Office Insights can be saved with selected filters so the same report setup can be used again. Saved reports can also be scheduled for email delivery either once on a selected date or regularly on a daily, weekly or monthly schedule.
For example, a Sales Summary saved with a Last Week date filter can be scheduled for delivery every Monday, providing the previous week's results without recreating the report each time.
Save an Insights report
Step 1: Open Insights and select a report
- Open Back Office > Insights.
- Select the Insights submenu containing the required report.
- Open the report.
Different Insights reports provide different information and filtering options. Select the report that best matches the information required.
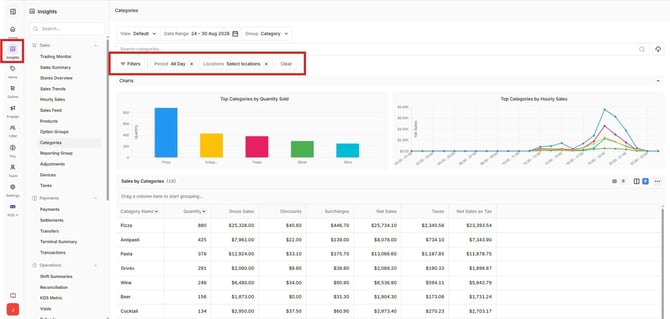
Step 2: Set the report filters
Configure the filters to determine the information included in the report.
Available filters vary depending on the report and may include:
- Date: Select a single date or a relative date range, such as Last Week.
- Period: Select from the configured trading periods or shifts.
- Locations: Select some or all Locations to include in the report.
- Group By: Choose how the report information is grouped.
Review the report after setting the filters to confirm it contains the required information.
Step 3: Save and share the report
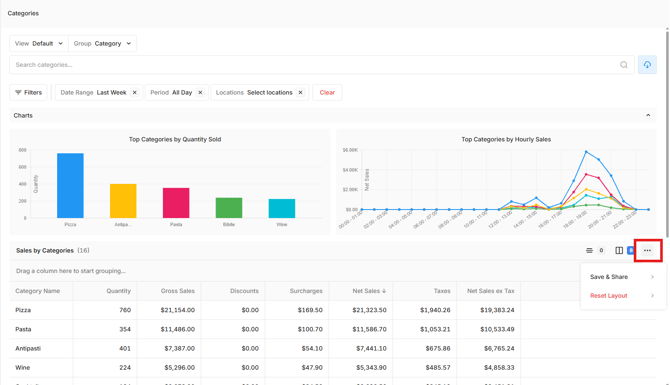
Saving the report retains its configured filters so it can be opened again or used for scheduled delivery.
- Select the three dots icon in the top-right corner of the data table and select Save & Share.
- Complete the following:
- Name: Enter a name that clearly identifies the report, such as ABC Sales Summary – Last Week.
- Description: Enter a brief description if required, such as Sales Summary grouped by Sales Channel.
- Add users: Search for one or more users to share the saved report with. Users must already exist in Oolio One before they can be selected.
- Select Save and Share.
The report is saved with its configured filters.
Step 4: View saved reports
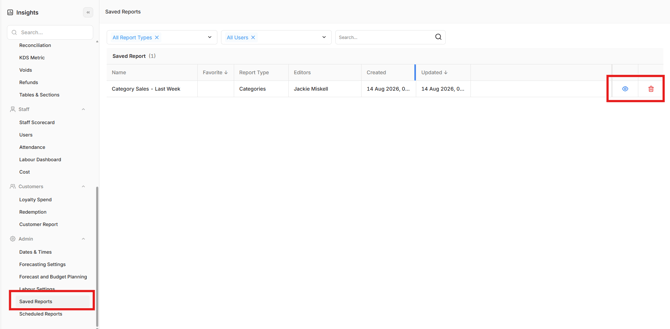
Open Insights > Admin > Saved Reports to view saved reports.
Use the icons to view or delete the saved report.
Schedule a Report
Scheduling sends a previously saved Insights report to selected recipients by email. Reports can be sent once on a selected date or automatically on a recurring schedule.
A report must be saved before it can be scheduled.
Step 1: Create a report schedule
- Open Back Office > Insights > Scheduled Reports.
- Select Create.
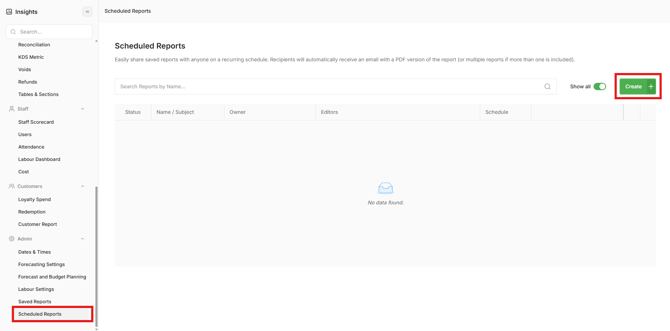
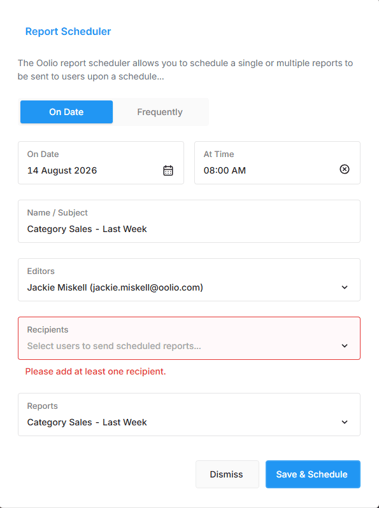
Complete the schedule details to determine when the report is sent, who receives it and which saved report is delivered.
- Select when the report should be delivered:
- On Date: Sends the report once on the selected date.
- Frequently: Sends the report automatically on a recurring schedule:
- Daily: Sends every day at the configured time until the schedule is made inactive.
- Weekly: Sends every week on the selected day and time until the schedule is made inactive.
- Monthly – On Date: Sends on the same date of each month at the configured time until the schedule is made inactive.
- Monthly – On Day: Sends on either the first or last day of each month at the configured time until the schedule is made inactive.
- Enter a Name for the schedule. Use a name that clearly identifies what will be delivered, such as Weekly Sales or Loyalty Reports.
- Add the required recipients:
- Search by name or email.
- Select the checkbox beside each required recipient.
- Add at least one recipient.
- To remove a recipient, find them in the Recipients field and clear their checkbox.
- Use the Report dropdown to select the required saved report. Only previously saved reports available to the user appear in the Report dropdown. Each scheduled delivery generates the report using the parameters saved with that report. For example, if a Sales Summary is saved using Last Week and scheduled to run every Monday, each Monday's report contains data for the previous week
- Select Save & Schedule
Important: When editing an existing schedule, selecting Save & Schedule creates a new schedule. Select Save Changes to update the existing schedule instead.
The scheduled report is now ready to be emailed to the selected recipients according to the configured schedule.
Manage scheduled reports
Open Back Office > Insights > Scheduled Reports to view existing schedules.
A schedule cannot be deleted. If a scheduled report is no longer required, make the schedule inactive from the Scheduled Reports list.