
Modifiers and Option Groups allow customers to customise products when ordering in Oolio One. Modifiers are individual selections, such as Soy Milk, Extra Cheese or Chips, while Option Groups organise related Modifiers into reusable groups that can be attached to products.
For example, Soy Milk and Almond Milk could be added to a Milk Options Option Group and then used on products that offer a choice of milk.
Step 1: Create Modifiers
Create each individual Modifier that customers may select when ordering. Once created, related Modifiers can be combined into an Option Group.
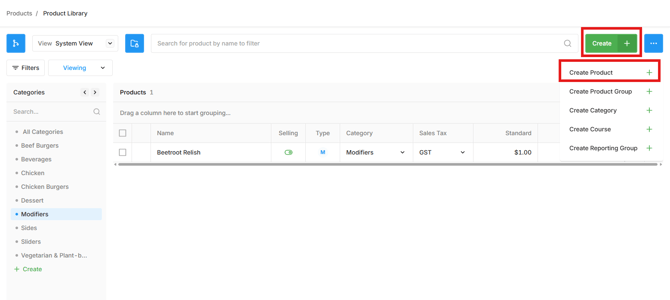
- Open Back Office > Products.
- Select Create.
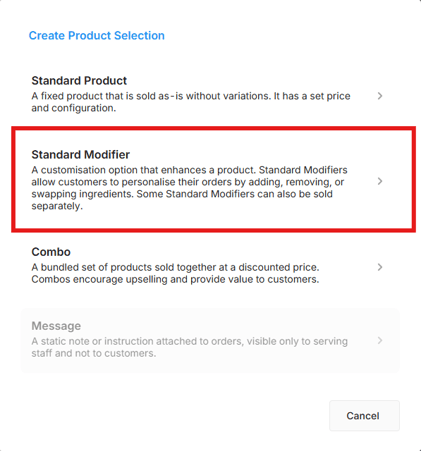
- Select Create Product and then Standard Modifier.
- Complete the required fields:
- Name: Enter the name of the Modifier.
- Product Group: Select the Product Group the Modifier belongs to.
- Category: Select the Category used to organise the Modifier.
- Reporting Group: Select the Reporting Group used for reporting.
- Select Create
- Select the Inventory tab and use Locations to select the locations where the modifier is available for sale.
- Select Save
- Open the Pricing tab.
- Select the required Sales Tax code.
- Enter the standard price.
- Use the Price List filters to display and enter other prices where required.
- Repeat these steps for each Modifier required.
Step 2: Create an Option Group
Option Groups combine related Modifiers into reusable sets. For example, a Milk Options group could contain Soy Milk and Almond Milk, while a Side Choices group could contain Chips and Salad.
- Open Back Office > Option Groups
- Select Create
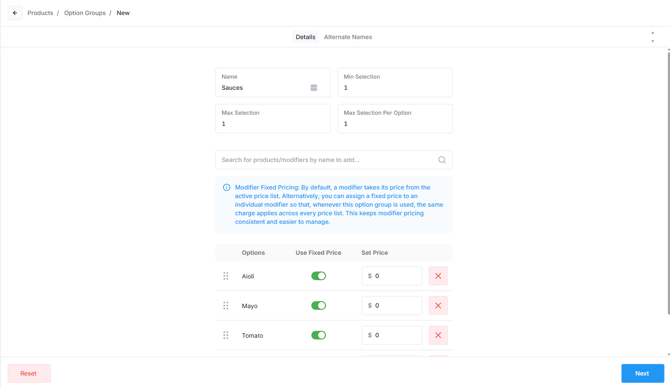
- Enter the Option Group name. Use a clear name that identifies the type of selection being offered, particularly when the Option Group will be reused across multiple products.
Examples include:
- Milk Options
- Side Choices
- Sauce Options
- Set the minimum and maximum number of selections where required.
- Use the search field to add the required Modifiers.
- Use the 6 dot icon to drag and reorder options
- Select Next and Create
Step 3: Attach an Option Group to a product
Attach the Option Group to each product where the selections should be available during ordering.
- Open the required product.
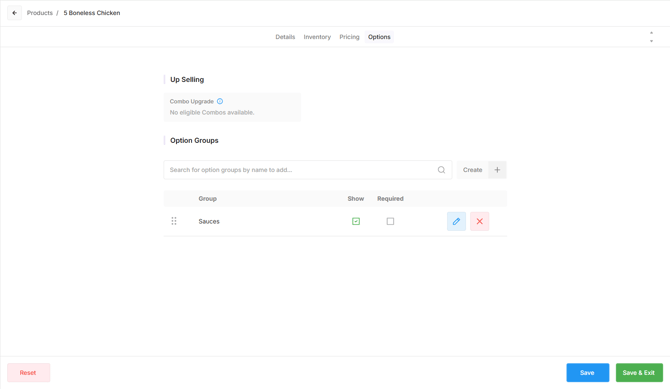
- Open the Options tab.
- Search for the required Option Group.
- Select the Option Group to add it to the product.
- Select Show if the Option Group should prompt when the product is ordered.
- Select Required if a selection must be made when the product is ordered.
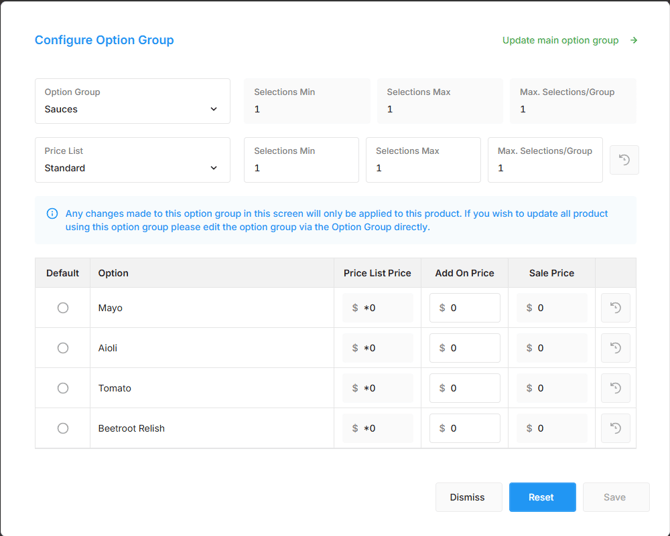
- Select the pencil icon if the Option Group settings need to be changed for this product.
- Adjust the required settings:
- Selections Min, Max and per Group: Control how many options can be selected for the product.
- Add On Price: Enter a different additional price when the price for this product should differ from the price configured on the Modifier.
- Default: Set Modifiers as default selections where required.
- Select Save.
- If multiple option groups are attached, use the 6 dot icon to drag and reorder the option groups.
- Select Save.
Review the product after attaching the Option Group to confirm the required Modifiers and settings have been applied.