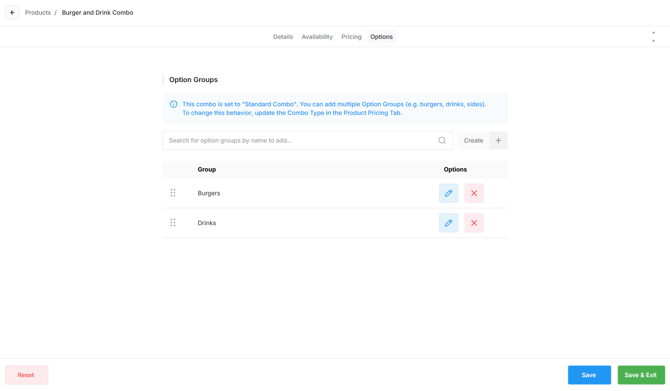
Combos are used to bundle multiple products together at a set price. A combo can be configured in back office to include specific products and pricing, allowing businesses to offer value to customers compared to purchasing products individually. This is commonly used for meal deals or promotional offers.
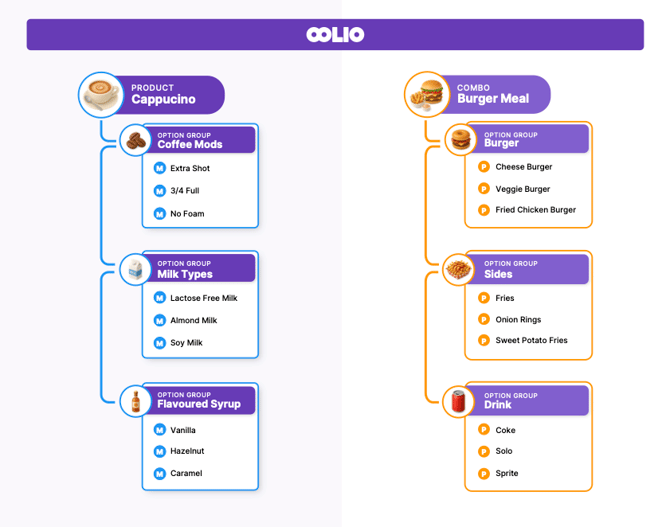
In Oolio One, combos are created using the Option Group feature. For combos, products are added directly into the option groups, whereas for standard products like a coffee, modifiers are added instead. To help distinguish between the two, products are indicated with a P icon and modifiers with an M icon (see diagram below).
Before starting
Create all products that will be included in the Combo before creating the Product Option Groups.
See Create a product for more information.
Step 1: Create Product Option Groups
Create a separate Product Option Group for each component of the Combo.
For example, a coffee and breakfast Combo could use:
- one Option Group containing the available coffee products
- one Option Group containing the available breakfast products
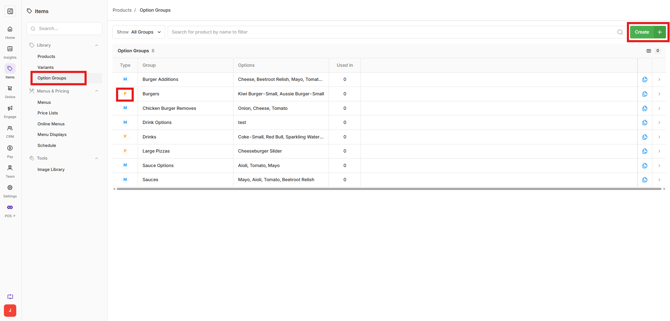
- Open Back Office > Items > Option Groups.
- Select Create.
- Enter a name for the Option Group.
- Set the required Min Selection and Max Selection values. These determine how many products can be selected from the group.
- Set Max Selections per Option to control how many times the same product can be selected.
- Use the search field and search for the product to include.
- Select the product to add it to the Option Group.
- Repeat until all required products have been added.
- Select Next and Create.
The new Option Group appears with a P icon, indicating that it contains products rather than Modifiers.
Repeat these steps for each component of the Combo.
Step 2: Create the Combo
After creating the Product Option Groups, create the Combo and enter its main product and pricing information.
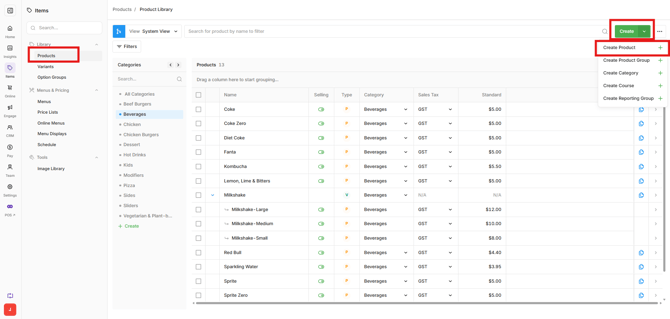
- Open Back Office > Items > Products.
- Select Create and Create Product.
- Select Combo and Regular Combo.
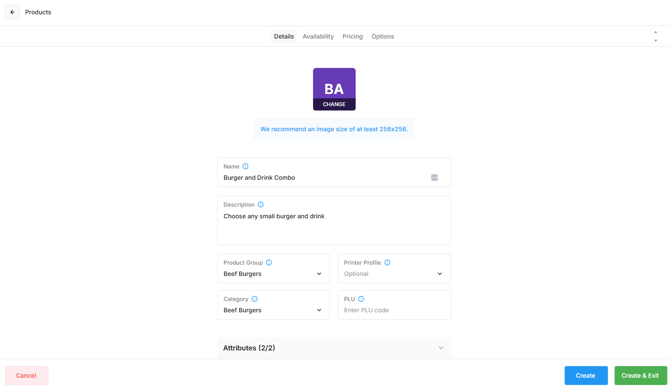
- Fill in the following details:
- Product Name: The product name displayed on POS, Kiosk and online ordering.
- Description: Additional information about the product, typically displayed on Kiosk and online ordering.
- Product Group: The top-level structure used to organise products within the product library.
- Category: Groups similar products together to help organise and display them in menus.
-
- Printer Profile: Leave this empty if each product within the Combo should print only to its usual configured printer. Select a Printer Profile if the complete Combo should also print to another configured printer.
Note: Selecting a Printer Profile for the Combo does not replace the printing configuration of the individual products. Each product continues to print to its usual destination, and the complete Combo also prints to the selected Printer Profile.
- Select Create
- Select the Inventory tab and use Locations to select the locations where the combo is available for sale
- Open the Pricing tab and configure the required pricing settings:
- Combo Type: Select Standard.
- Sales Tax: Set the Sales Tax for the combo
- Price Lists: Enter the selling price in the Standard column. If multiple Price Lists are available, select each from the dropdown and enter the applicable selling price.
- Select Save
Step 3: Add Option Groups to the Combo
Add the Product Option Groups created in Step 1 to define the selections available within the Combo across POS, Kiosk and online ordering.
- Open the Options tab.
- Search for a Product Option Group created in Step 1 and select on it to add.
- Repeat for each Product Option Group required for the Combo.
- Select the edit pencil to view the products within the Option Group.
- Select the red X to remove an Option Group from the Combo if required.
- Use the 6 dot icon to drag and reorder the Option Groups
- Select Save.