Products are used to create and manage the items that will be sold or displayed as buttons on the POS, Kiosk, and online ordering channels. These are set up in Oolio Back Office and then synced across all ordering platforms.
This guide outlines how to create a basic product. Product functionality can be extended using features such as options, modifiers, and pricing rules.
Before creating a product, it is recommended that key elements are set up where required, including:
- Categories to organise products
- Any options or modifiers to be applied
These are not always mandatory, but preparing them in advance helps streamline the setup process and reduces the need for rework.
Step One: Creating a New Product
To create items for POS, Kiosk, or online ordering, use the Back Office. The products will later need to be synced all the ordering platforms to be available.
-
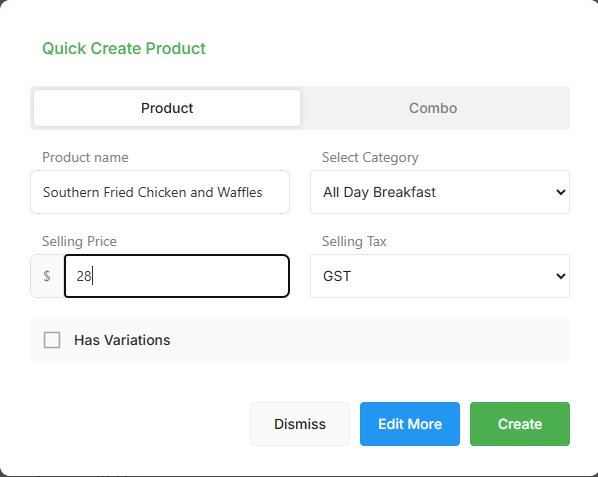
Select the Create Icon on the right-hand side of the screen to open the 'Quick Create' icon and complete the following;
-
Product Name: The name of the product as it will appear on POS, Kiosk, and online ordering.
-
Category: A product category is used to group similar items together so they are easier to organise and display in menus.
-
Selling Price: The price the product will be sold for.
-
Selling Tax: The tax applied to the product when it is sold.
-
Has Variations: Enables multiple sizes or variations for the product. Prices for each variation can be configured at a later stage.
Editing a Product
Once a product has been created using the 'Quick Create' screen, it can be further configured using the extended features available in the Product Settings.
-
Select the pen icon in line with the product to open the Product Settings page.
- This will open the Product Settings page, where settings across the General, Availability, Pricing, and Options tabs can be viewed and updated before saving changes. See below;

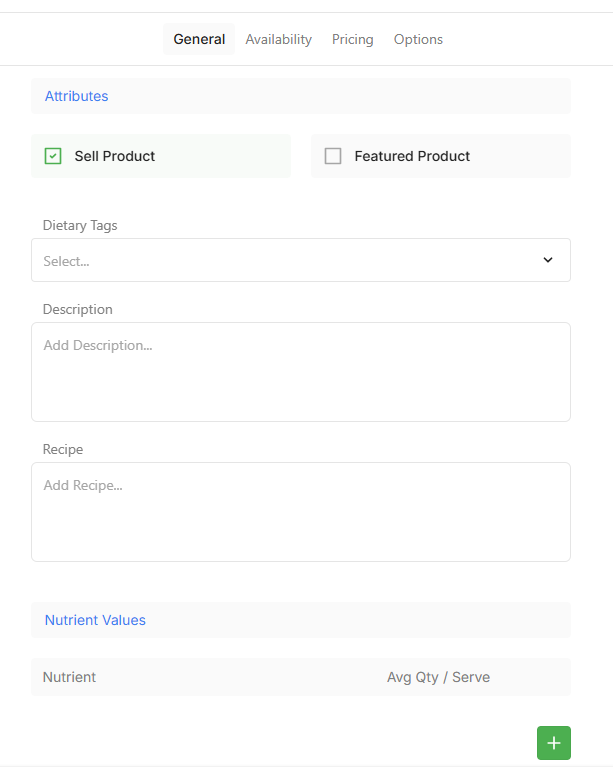
General Tab
The general tab is used to manage general product settings, including display information and printing behaviour.
-
Image Icon: Upload a high-resolution image of the product. This image will appear on Kiosk and Online menus alongside the product name, description, and price.
-
Name: The name displayed on the product button on the ordering screen. This name is also printed on receipts and prep dockets.
- POS Name:
-
Kitchen Name: An alternate, shortened name used on prep dockets to make it easier for kitchen staff to read.
-
Printer Profile: Determines where the product prints by assigning it to a configured printer routing profile.
-
Reporting Group: Used to group products in reports. Products without a reporting group will be assigned to Other.
-
Category: A product category is used to group items together and control where the product appears in the menu.
- Product Colour:
- Measured By:

-
Sell Product: Controls whether the product is available for sale. If unchecked, the product is archived and will no longer appear on POS, but remains visible in Office.
- Featured Product:
-
Dietary Tags: Allows dietary information to be assigned to the product. These tags are visible on POS, Online Ordering, and Kiosk.
-
Allergen Labels: Used to indicate any allergens present in the product, helping inform customers and staff.
-
Description: Provides additional details about the product, typically shown on Online Ordering and Kiosk.
-
Recipe: Allows a recipe to be attached to the product. Recipes can be printed from the Front-of-House POS for staff reference.
-
Nutrient Values: Nutritional information can be added and displayed on POS and other ordering channels.
Availability Tab
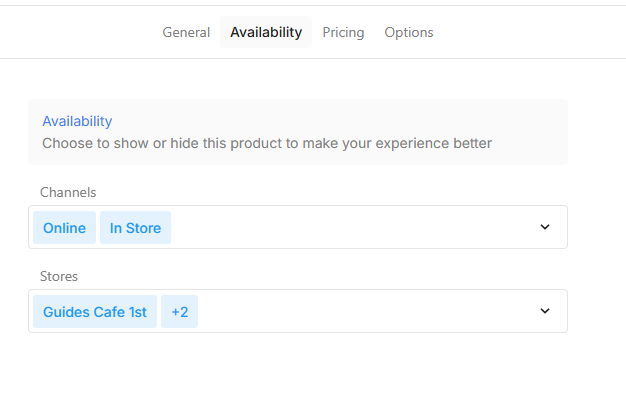
The availability tab is used to control where and when the product is available for sale.
-
Channels: Select where the product is sold, such as POS and Online Ordering. By default, products are available on all channels.
-
Stores: For multi-venue setups, choose which stores the product is available in. Products can be assigned to one or multiple locations.
Pricing Tab
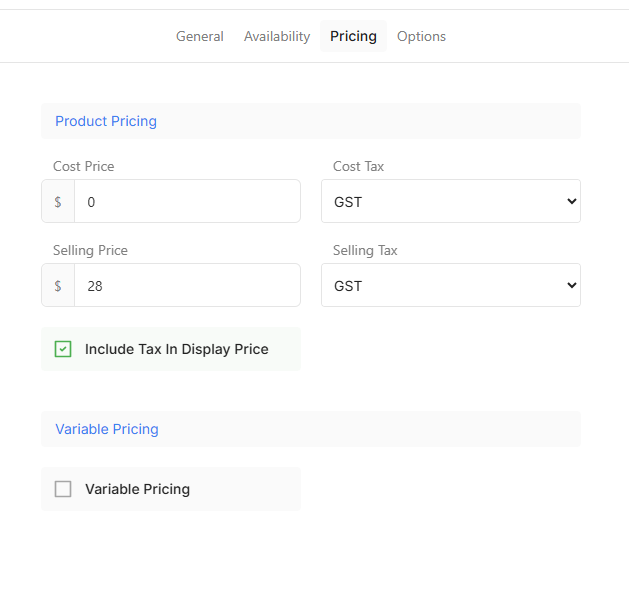
The pricing tab is used to manage all pricing settings for the product.
-
Cost Price: The cost to produce or purchase the product. This is typically used for reporting and margin calculations.
- Cost Tax:
-
Sell Price: The price the product is sold for. This should include tax if applicable.
- Selling Tax:
- Include Tax in Display Price:
-
Variable Pricing: Allows the product to be sold at a custom price. When enabled, a minimum and maximum price can be set, and the final price is entered at the POS during sale.
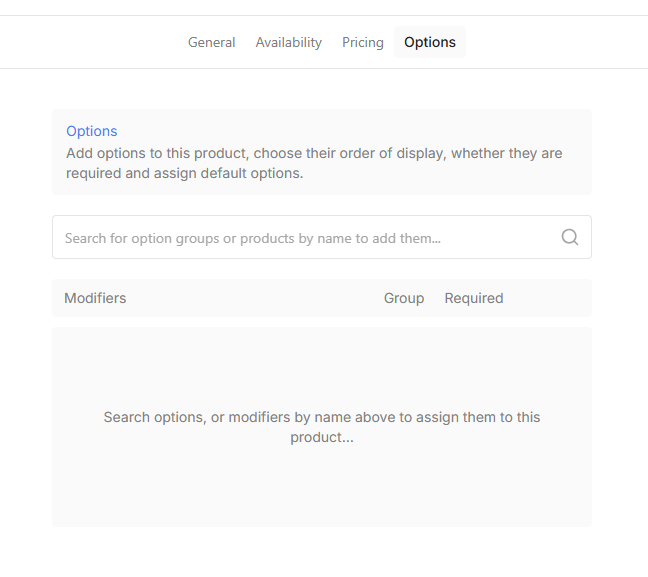
Options Tab
The options tab is used to assign options, modifiers, or related products to a product.
-
Options: Use the search bar to add Option Groups or Modifiers. This can also be used to link existing products when building combo-style items.
- Modifiers:
Saving Your Changes
- Click Save after making changes before moving to another tab to ensure updates are not lost.
- After updating a product in Office, open the POS and select Sync Data to apply the changes.
- If the product does not appear on POS after syncing, check that:
- All required product settings have been completed
- The product has been added to a Menu Layout
- Refer to related guides for steps on assigning products to a Menu Layout.