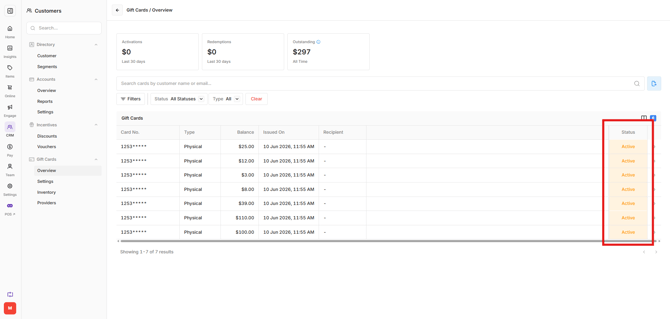
Gift Cards provide stored value that customers can purchase online or in-store and redeem through Oolio One POS or the Oolio Online Store. Gift Cards are configured in Oolio One Back Office, where the feature can be enabled, redemption locations and values configured, the online storefront customised, and physical Gift Card inventory managed.
Online Gift Card sales are assigned to a selected Reporting Location, while Redeemable Locations determine where Gift Cards can be used.
Before starting
Before setting up Gift Cards:
- Prepare the business logo, brand colour and any custom Gift Card artwork required for the online storefront.
- Have physical Gift Card numbers available for import if physical Gift Cards will be sold. Alternatively, Gift Card numbers can be generated.
Step 1: Enable Gift Cards
Enable the Gift Card feature before configuring the Gift Card store and inventory.
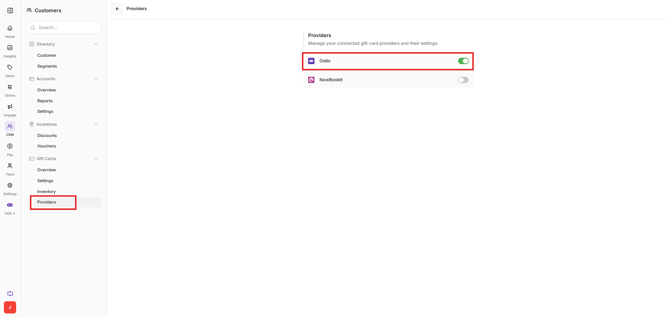
- Open Back Office > CRM > Gift Cards > Providers
- Toggle on Oolio as the Gift Card provider.
Step 2: Configure Gift Card details
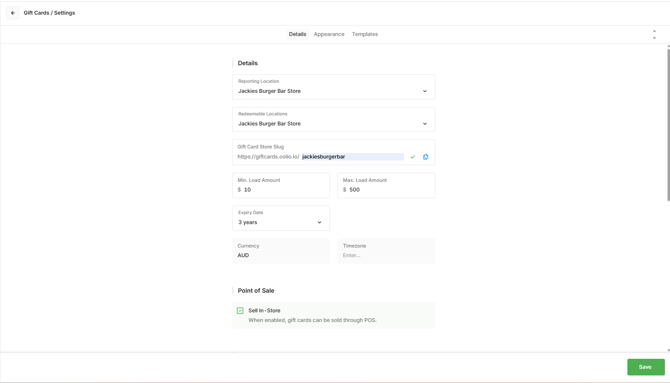
Open Back Office > CRM > Gift Cards > Settings, then select the Details tab.
Configure:
- Reporting Location: Select the location used to report eGift Card purchases made through the online Gift Card store. Online Gift Card payments are processed through this location and transferred to the nominated bank account associated with it.
- Redeemable Locations: Select the locations where Gift Cards can be redeemed.
- Gift Card Store URL: Define the URL for the online Gift Card storefront. The URL must be unique and cannot match an existing store URL.
- Load Amount Limits: Set the minimum and maximum amount that can be loaded onto a Gift Card.
- Expiry Period: Set how long Gift Cards remain valid.
Important: Gift Card expiry requirements may be governed by local consumer law. For Australian businesses, purchased Gift Cards generally require a minimum three-year expiry period.
- Point of Sale: Enable this setting to allow Gift Cards to be sold through Oolio One POS. If disabled, Gift Cards can be sold online only.
- Payments: Online Gift Card payments are processed using OolioPay. Merchant ID and Store ID are required when Gift Cards are sold online. Please reach out to Oolio Support for these details.
- Enable Payment Surcharge: Enable and configure a payment surcharge and label if applicable.
- Pre-Set Amounts: Configure up to five preset Gift Card values. Customers can also enter a custom amount within the configured minimum and maximum limits.
Select Save.
Step 3: Configure the online Gift Card store appearance
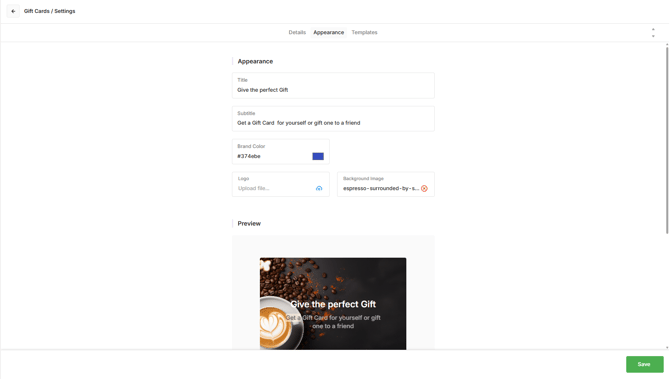
Use the Appearance tab to control how the online Gift Card storefront is presented to customers.
- Open the Appearance tab.
- Configure:
- Title: Enter the heading for the online Gift Card sales page.
- Subtitle: Enter supporting text to appear below the heading.
- Organisation Logo: Upload the business logo displayed on the storefront.
-
- Brand Colour: Select the colour used for storefront elements such as buttons.
- Background Image: Upload an image to display behind the page header.
- Review the preview to check how the storefront will appear to customers.
- Select Save.
Step 4: Select Gift Card templates
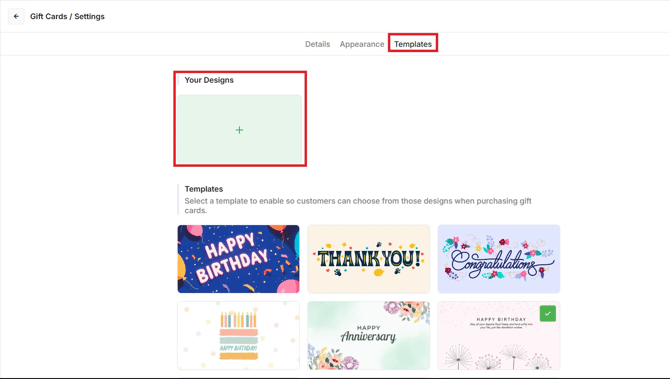
Templates determine the Gift Card designs available to customers when purchasing a digital Gift Card.
Open the Templates tab.
Oolio provides pre-loaded designs, including designs for occasions such as:
- Happy Birthday
- Thank You
- Congratulations
Select a template to make it available in the Gift Card store. Selected templates display a green tick.
Select the template again to deselect it when it should no longer be available.
Custom templates can also be created and used alongside the pre-loaded designs.
Step 5: Create a custom Gift Card template
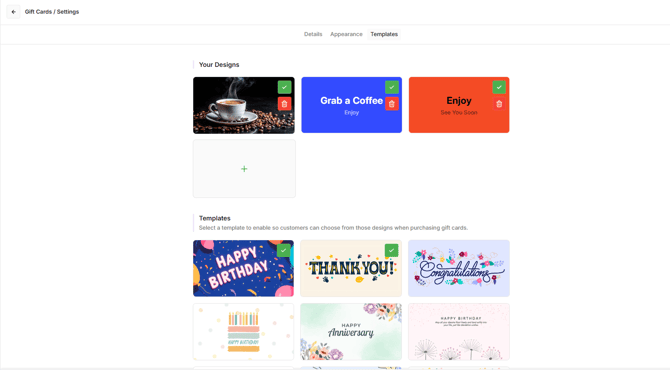
Custom Gift Card templates can use configured text and colours or an uploaded image.
Create a text and colour design
- Select the green + under Your Designs.
- Enter the Title.
- Enter a Subtitle if required.
- Select the Background colour.
- Select the Text colour.
- Review the preview.
- Select Create.
Important: Custom designs cannot be edited after they are created. Delete and recreate the design if changes are required.
Create an image design
- Select the green + under Your Designs.
- Select the Image tab.
- Upload the required artwork.
- Review the preview.
- Select Create.
An uploaded image and configured text cannot be combined within the same template. If both are required, create the complete artwork externally and upload it as an image.
Step 6: Configure a physical Card Background
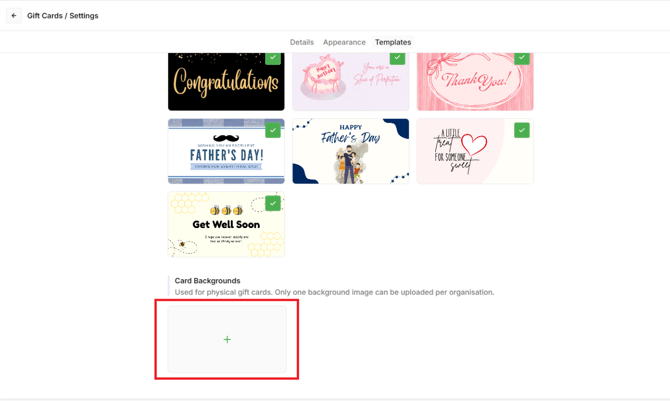
Card Backgrounds can be used to preview how a design will appear on a physical Gift Card before sending it for printing.
- Open the Templates tab.
- Scroll to the bottom of the Templates screen to find Card Backgrounds.
- Upload the required Card Background.
- Review how the Gift Card design appears on the physical card.
Only one Card Background can be uploaded for the organisation.
Physical Gift Card Configuration
Before physical gift cards can be sold, they need to be entered into the system as inventory. Existing card numbers can be imported from a file, or new card numbers can be generated.
Option 1: Import existing Gift Card codes
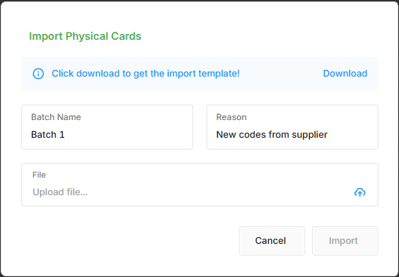
Use Import when gift card codes have been provided by a supplier or existing gift card stock needs to be added to Oolio One.
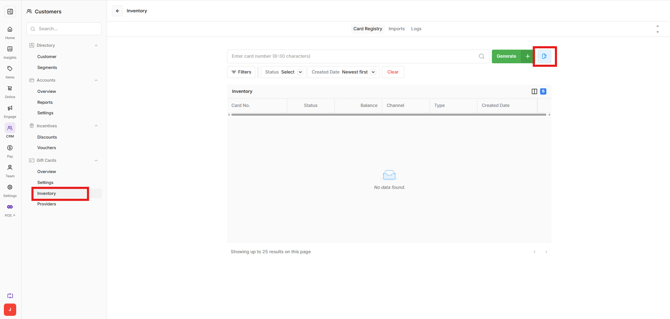
- Open Back Office > CRM > Gift Cards > Inventory.
- Select the import icon.
- Enter a Batch Name and Reason.
- Attach the CSV containing the Gift Card codes. Alternatively, download and complete the provided import template.
- Complete the import.
Note: Gift Card codes must be between 8 and 16 characters and can contain letters (A–Z) and numbers (0–9). Do not include spaces, dashes or special characters.
After importing, open the Imports tab to review the results.
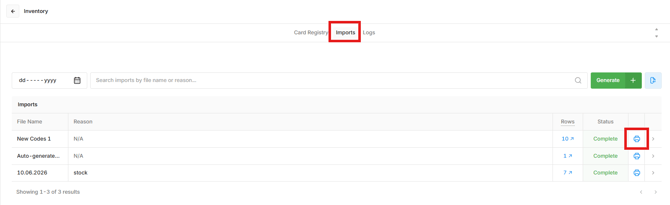
Select the Actions icon for an import batch to view its details, including any rows that failed to import.
If rows fail:
- Review the error file to identify the affected rows.
- Correct the errors in the CSV.
- Re-import only the corrected rows.
Option 2: Generate new Gift Card codes
Use Generate to create new Gift Card codes directly in Oolio One. Generated codes can then be exported and supplied to a card printer when physical cards are being produced.
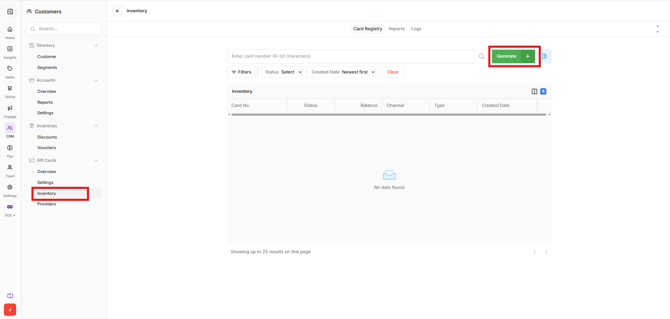
- Open Back Office > CRM > Gift Cards > Inventory.
- Select Generate.
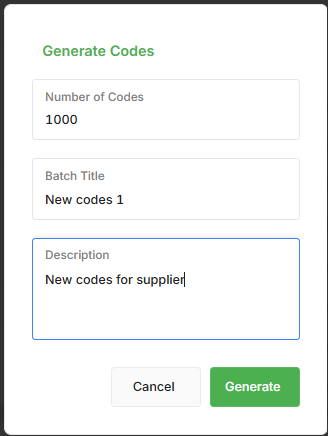
- Enter the number of codes to generate, such as 100.
- Enter a batch name.
- Enter a description if required.
- Select Generate.
The generated cards are added to Gift Card inventory with an In Stock status.
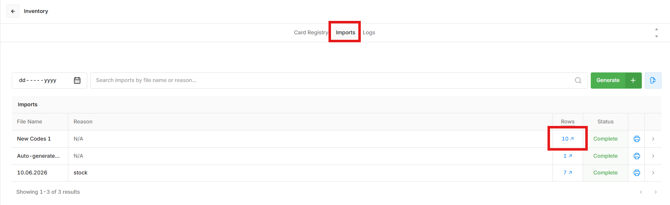
Select Imports and into the Rows column to export a file containing the generated codes. The file can then be supplied to the business responsible for printing the physical Gift Cards.
Create a PDF for physical Gift Cards
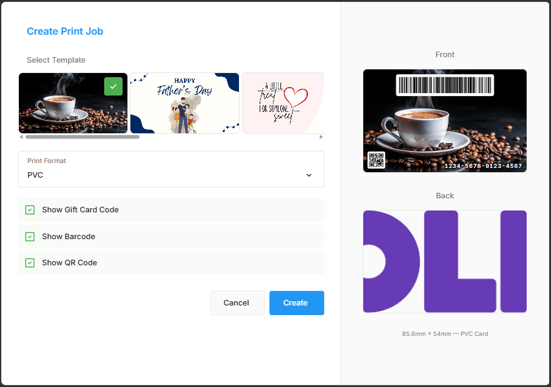
Create a PDF when physical Gift Cards need to be printed from a batch of imported or generated card codes. The PDF combines the selected Gift Card template with each card's unique code, barcode or QR code, creating a file that can be printed in the required physical card format.
This step is only required when producing physical Gift Cards from Oolio One. It is not required for digital Gift Cards.
- Open Back Office > CRM > Gift Cards > Inventory > Imports.
- Find the required batch.
- Select the Print icon.
- Select Print New.
- Select the required Template.
- Select the Print Format:
- PVC
- Glossy Card (GSM300)
- Choose the information to include on the cards:
- Show Gift Card Code
- Show Barcode
- Show QR Code
- Review the preview on the right of the screen.
- Select Create.
- Download the generated PDF.
The PDF is then ready to be printed or supplied for card production.
Manage physical Gift Card inventory
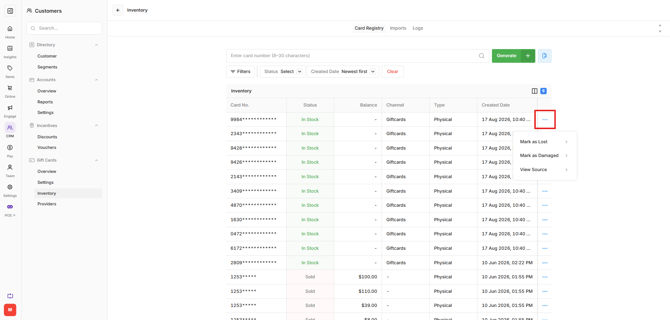
Physical Gift Cards can be managed from Back Office > CRM > Gift Cards > Inventory.
Inventory statuses indicate whether a physical card is available for sale or has been removed from use:
- In Stock: The physical card exists in inventory and is available for activation or sale.
- Sold: The physical card has been sold through POS.
- Lost: The physical card has been marked as lost and can no longer be sold or activated.
- Damaged: The physical card has been marked as damaged and should not be sold or used.
To update a physical Gift Card:
- Find the required card in Inventory.
- Select the Options menu (⋯) beside the card.
- Select the required action, such as marking the card as Lost or Damaged.
For a sold physical Gift Card, select the Options menu (⋯), then View Gift Card to view its Gift Card details.
View Gift Card statuses
Open Back Office > CRM > Gift Cards > Overview to view the status of Gift Cards after they have been issued.
The available statuses are:
- Issued: The Gift Card has been purchased.
- Active: The Gift Card is available for redemption.
- Partially Redeemed: Some of the Gift Card value has been redeemed and a balance remains.
- Fully Redeemed: The full Gift Card value has been redeemed and the balance is zero.
- Expired: The Gift Card has passed its expiry date.
- Cancelled: The Gift Card has been manually cancelled by the merchant.