
Oolio One Loyalty allows a business to create a Loyalty Program where customers earn points and redeem rewards through the POS and Online Store. Configure the program branding, earning rules and rewards to control how customers participate, with optional sign-up and birthday rewards available to encourage enrolment and engagement.
Before starting
- Oolio One Orders must be enabled before Loyalty can be set up.
- Have access to Oolio One Back Office.
- Prepare the Loyalty Program name, logo, brand colour and program description.
- Decide how customers should earn points and which rewards should be available.
- For multi-venue organisations, decide which Locations each earning rule and reward should apply to.
Step 1: Enable Oolio One Loyalty
Enable Loyalty before configuring the program settings, earning rules and rewards.
- Log in to Oolio One Back Office.
- Navigate to Engagement > Program Settings
- Select Start Using Loyalty.
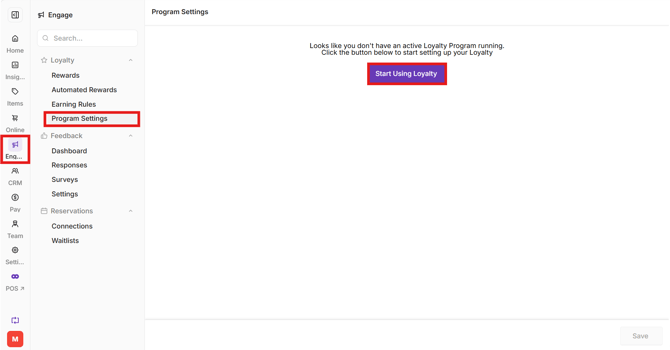
The Loyalty Program is now active, and the settings page will load.
Step 2: Configure the Loyalty Program
Use the program settings to control the name and branding customers see when interacting with the Loyalty Program.
-
Configure:
-
Name: Enter the name of the Loyalty Program.
-
Brand Color: Select the colour used for the Loyalty Program.
-
Logo: Upload the store or Loyalty Program logo. An image size of at least 256 × 256 pixels is recommended.
-
Points Alias (Singular): Enter the name used instead of "point" when referring to one point.
-
Points Alias (Plural): Enter the name used instead of "points" when referring to multiple points.
-
Description: Enter information explaining the Loyalty Program to customers.
-
Enrollment Page Slug: Automatically populated, this is used to access your Loyalty Program through online links.
-
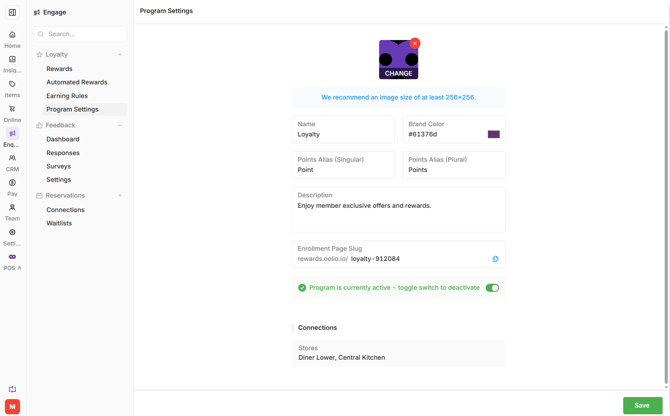
2. Save
Important: Avoid changing the Enrollment Page Slug after it has been established. Changing the slug changes the URL customers use to access the Loyalty Program.
Program settings can be edited again if the Loyalty Program needs to be updated.
Step 3: Configure Earning Rules
Earning rules determine how customers earn loyalty points from purchases.
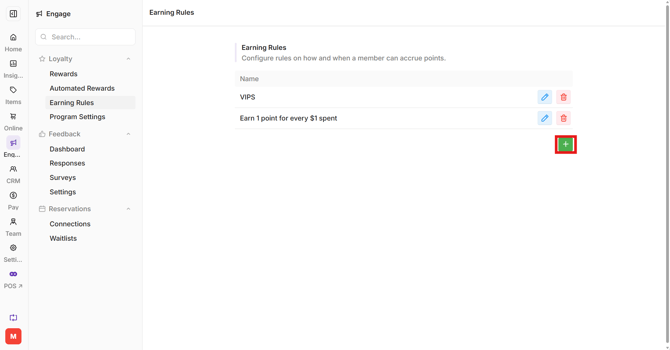
A default earning rule is provided and cannot be deleted. If only one earning rule is required, edit the default rule rather than creating another one.
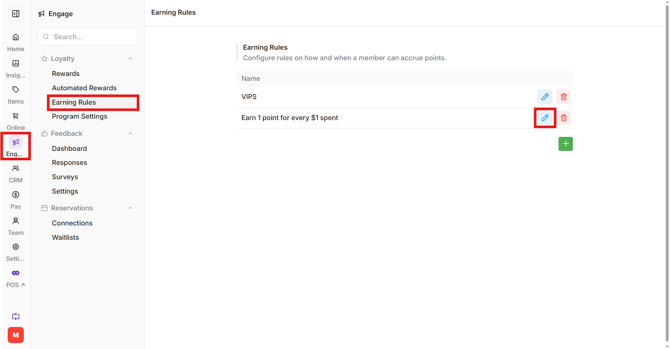
- Navigate to Earning Rules.
- Select the pen icon beside the default rule.
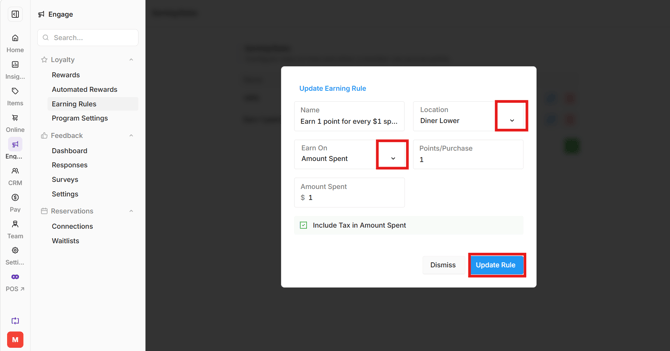
- Enter a Name that describes the earning rule.
- For a multi-venue organisation, use the drop-down down list to select the Location where the rule should apply.
- Under the Earn On drop-down list, select how points are earned:
- Product Purchase: Customers earn points based on the products purchased during the transaction.
- Amount Spent: Customers earn points based on the amount spent during the transaction.
- If using Amount Spent, select Include Tax in Amount Spent.
- Select Update Rule.
Add another Earning Rule
Create additional earning rules when customers can earn points in more than one way. Select the green + and repeat the above process as many times as required.
Step 4: Configure Rewards
Rewards determine what customers receive when they redeem their loyalty points.
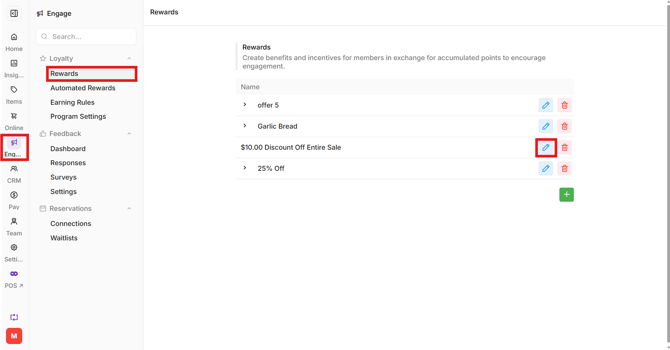
A default reward is provided and cannot be deleted. If only one reward is required, edit the default reward rather than creating another one.
- Navigate to Rewards.
- Select the pen icon beside the default reward.
- Enter a Name that describes the reward.
- For a multi-venue organisation, select the Location where the reward should apply.
- Under Reward Type, select:
- Order Discount: Allows customers to redeem points for a discount across the entire order.
- Product Discount: Allows customers to redeem points for a discount on selected products.
- Free Item: Allows customers to redeem points for a free item from the configured products.
- Enter the Redemption Value, this defines how many points a member will use to buy this reward.
- Select the Discount, a dollar value or percentage.
- Enter the Maximum Discount the member can receive when redeeming the reward.
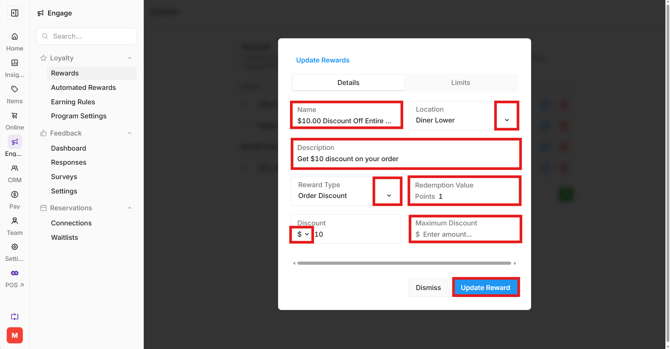
- Select Update Reward
Configure Reward Limits
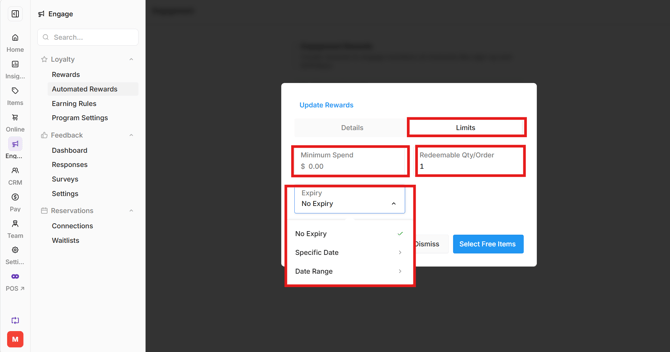
Use the Limits settings to control additional conditions that apply when customers redeem the reward.
- Open the Limits tab.
- Configure the required limits:
- Minimum Spend: Set the minimum transaction value required before the reward can be redeemed.
- Redeemable Quantity/Order: Set limits on how many times the same reward can be redeemed in a transaction or how many times the reward can be earned.
- Expiry: Enable an expiry when the reward should only remain available for a limited period.
- Select Update Reward.
The configured earning rules and rewards are now integrated with the POS and Online Store.
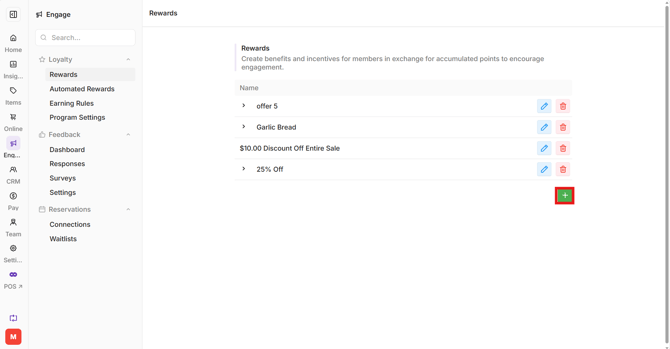
Add another Reward
- Create additional rewards by selecting the green + and repeat the above process as many times as required.
Step 5: Configure a Sign-Up Reward
A sign-up reward can encourage customers to enrol by automatically providing a configured reward when they join the Loyalty Program.
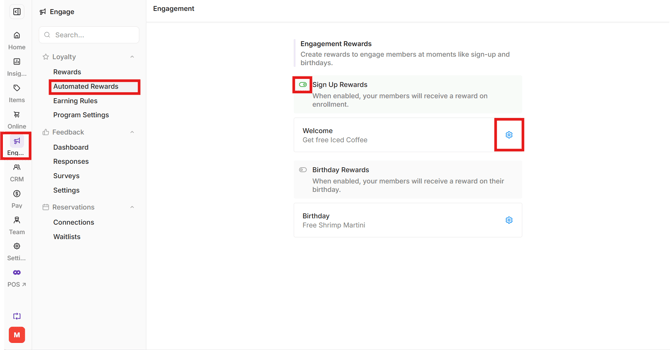
- Navigate to Engagement > Automated Rewards
- Toggle on Sign Up Rewards.
- Select the Settings gear icon
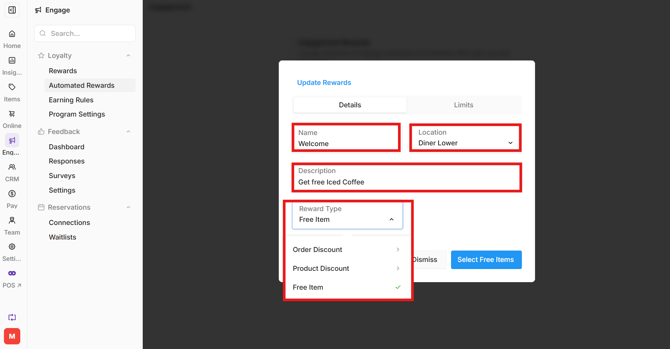
- Configure the reward using the required reward settings.
• Name of the Reward
• Select the Locations for the reward to be redeemed in
• Enter a Description
• Select the Reward Type
-
-
-
Order Discount: Allows customers to redeem points for a discount across the entire order.
-
Product Discount: Allows customers to redeem points for a discount on selected products.
-
Free Item: Allows customers to redeem points for a free item from the configured products.
-
-
Configure Reward Limits
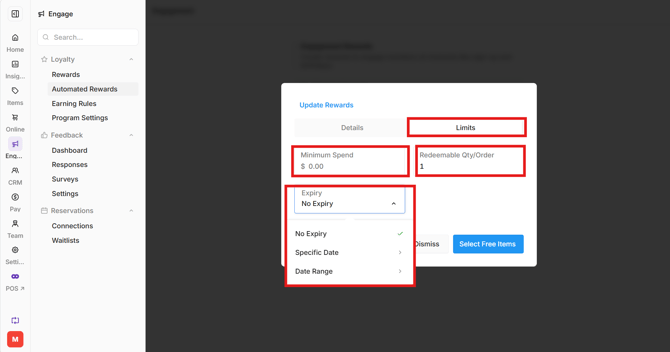
Use the Limits settings to control additional conditions that apply when customers redeem the reward.
- Open the Limits tab.
- Configure the required limits:
- Minimum Spend: Set the minimum transaction value required before the reward can be redeemed.
- Redeemable Quantity/Order: Set limits on how many times the same reward can be redeemed in a transaction or how many times the reward can be earned.
- Expiry: Enable an expiry when the reward should only remain available for a limited period.
- Click 'Select Free Items'
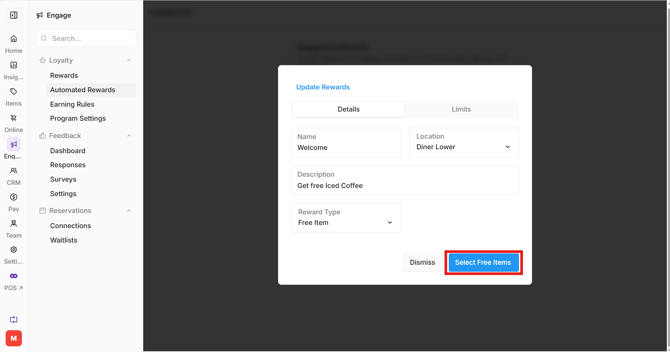
Add Free Items
- Select the Items to be included as 'Free Items' using the drop down list.
- Selected Items will show in a list, they can be removed using the red X.
- Select Update Reward
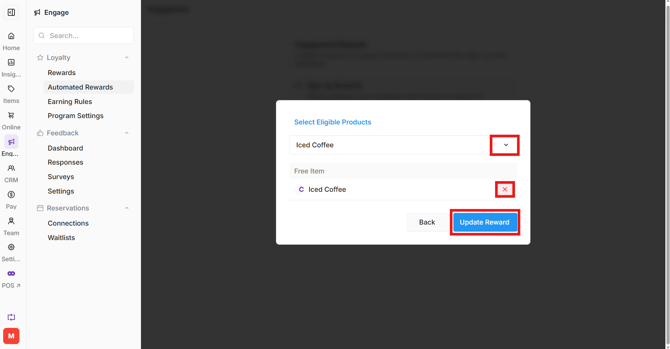
Step 6: Configure a Birthday Reward
A birthday reward provides eligible customers with a reward that can be redeemed during the month of their birthday; the customer receives a notification on the last day of the month before their Birthday, eg. D.O.B 10.04.1986 they receive the notification on 31.03.
The date of birth is captured at the time of Enrolling in the Loyalty Program or through an update entered by an operator.
Note: If a member signs up during the month of their Birthday, they do not receive the reward for the current year.
- Navigate to Engagement > Automated Rewards
- Toggle on Birthday Rewards.
- Select the Settings gear icon
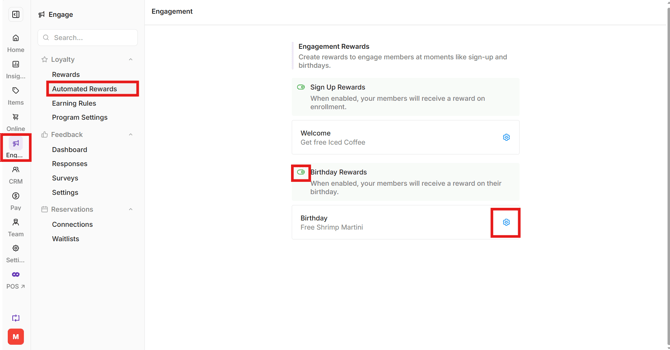
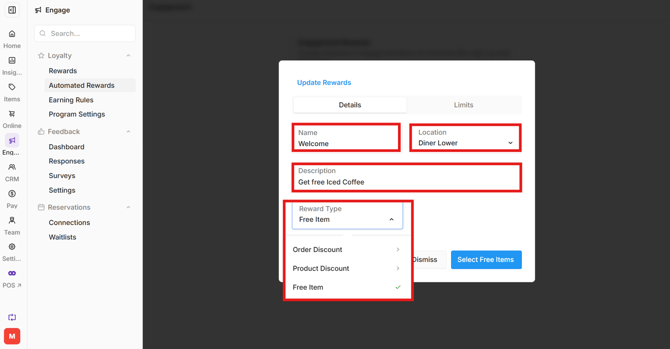
- Configure the reward using the required reward settings.
• Name of the Reward
• Select the Locations for the reward to be redeemed in
• Enter a Description
• Select the Reward Type
-
-
-
Order Discount: Allows customers to redeem points for a discount across the entire order.
-
Product Discount: Allows customers to redeem points for a discount on selected products.
-
Free Item: Allows customers to redeem points for a free item from the configured products.
-
-
Configure Reward Limits
Use the Limits settings to control additional conditions that apply when customers redeem the reward.
- Open the Limits tab.
- Configure the required limits:
- Minimum Spend: Set the minimum transaction value required before the reward can be redeemed.
- Redeemable Quantity/Order: Set limits on how many times the same reward can be redeemed in a transaction or how many times the reward can be earned.
- Expiry: Enable an expiry when the reward should only remain available for a limited period.
- Click 'Select Free Items'
Add Free Items
- Select the Items to be included as 'Free Items' using the drop down list.
- Selected Items will show in a list, they can be removed using the red X.
- Select Update Reward