
Oolio One Kiosk provides a self-service ordering experience where customers can browse the menu, select an order type, place an order and complete payment. Each kiosk uses a Device Profile to control its menu, price list, order identification, available order types and branding.
Before starting
Make sure the following are ready before configuring the kiosk:
- The Menu, Price List and Order Types required for the kiosk have been configured.
- An Oolio Pay payment terminal is available to connect to the kiosk.
- Any printers required for order printing have been configured.
- The kiosk device has a stable network connection.
Step 1: Create the Kiosk Device Profile
The Device Profile controls how the kiosk operates, including the menu and pricing it uses, available Order Types and how orders are identified.
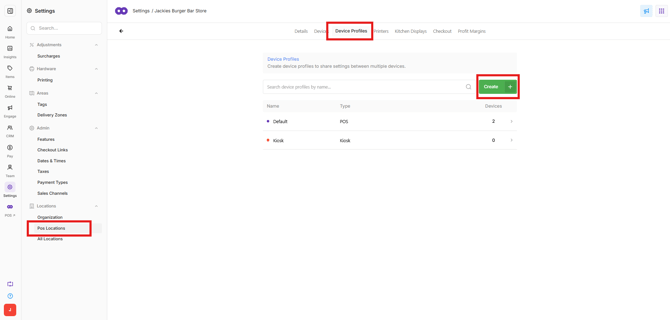
- In Oolio One Back Office, open Settings > Locations.
- Select the Store where the kiosk will be installed.
- Open the Device Profiles tab.
- Select Create.
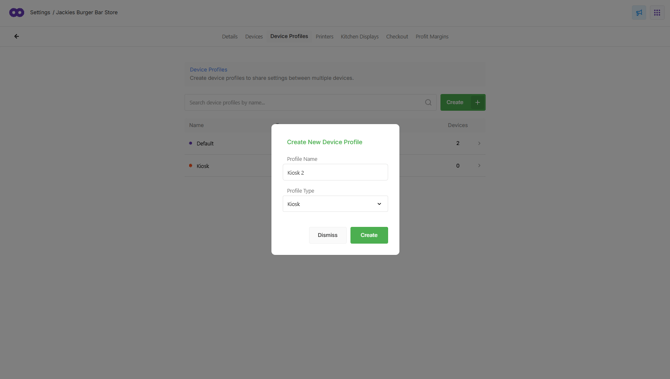
- Enter a Name for the Device Profile.
- Select Kiosk as the profile type.
- Select Create.
Step 2: Configure the Kiosk Device Profile
Select the newly created Kiosk Device Profile to configure its settings.
Details:
-
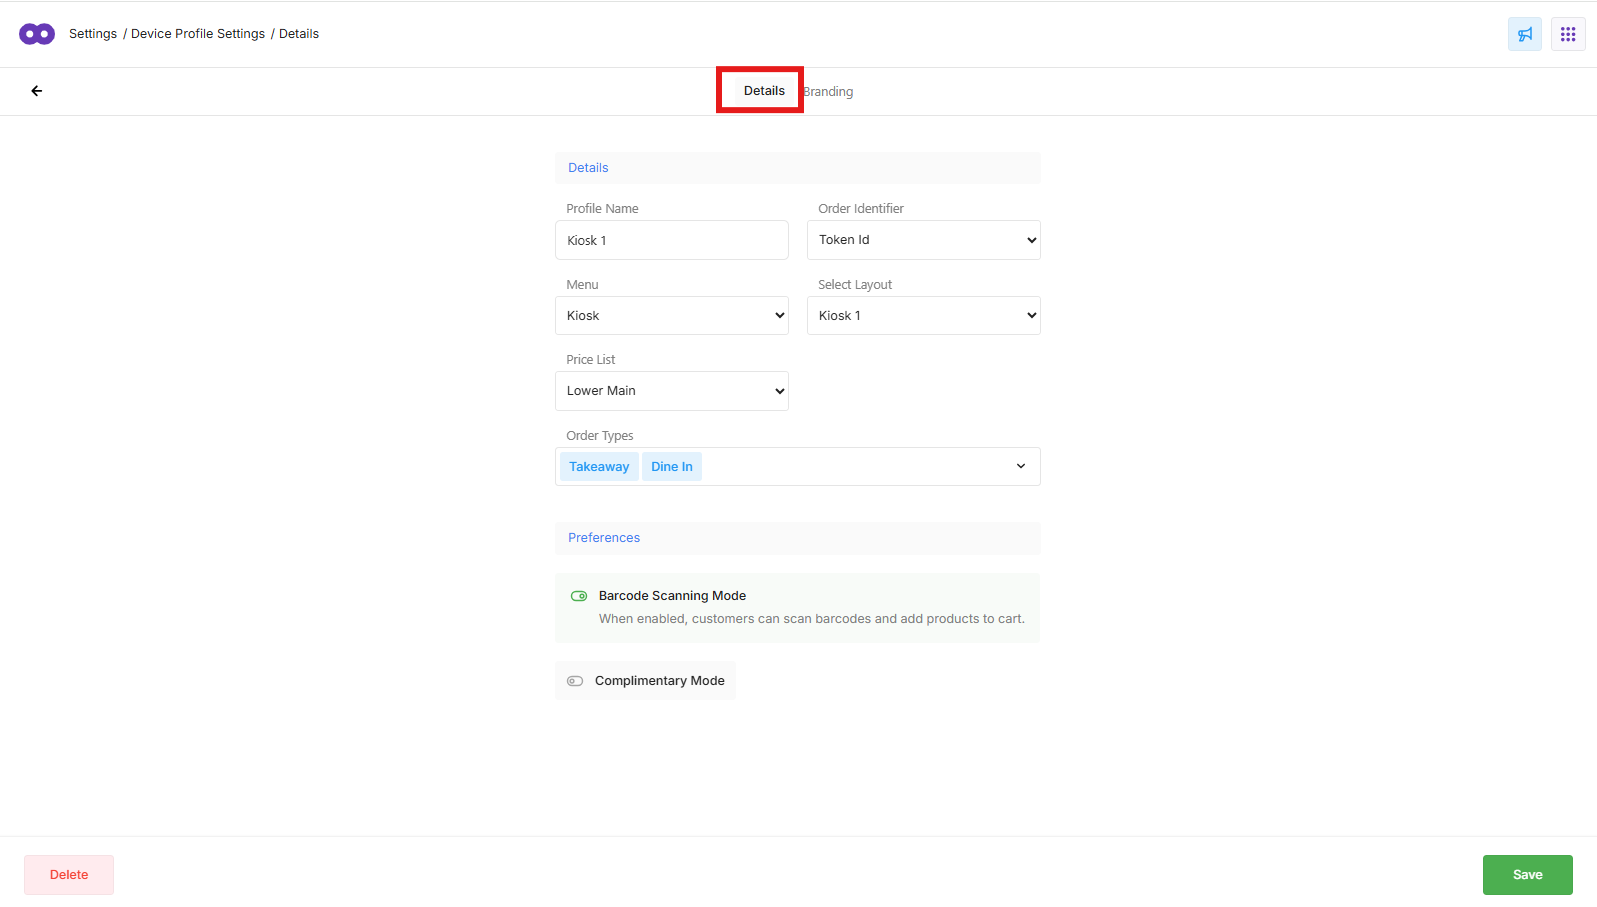
Configure the following:
- Profile Name: Edit the name if required.
- Order Identifier: Select how customers' orders will be identified:
- Token ID: Assigns a unique number to the order. The number is printed on the customer's receipt and can be used to identify the order when it is ready.
- Customer Name: Prompts the customer to enter their name. The name is included with the order and can be used to call the customer when it is ready.
- Menu: Select the menu to be displayed on the kiosk.
- Layout: Select the required menu layout.
- Price List: Select the pricing used for orders placed through the kiosk.
- Order Types: Select the Order Types available through the kiosk, such as Dine In or Takeaway.
Preferences:
-
Configure any additional kiosk behaviour required:
-
- Enable Barcode Scanning Mode where a barcode scanner is installed.
- Enable Complimentary Mode for environments where customers can place orders without seeing prices or completing payment, such as hosted events or VIP dining.
- Select Save.
Branding:
-
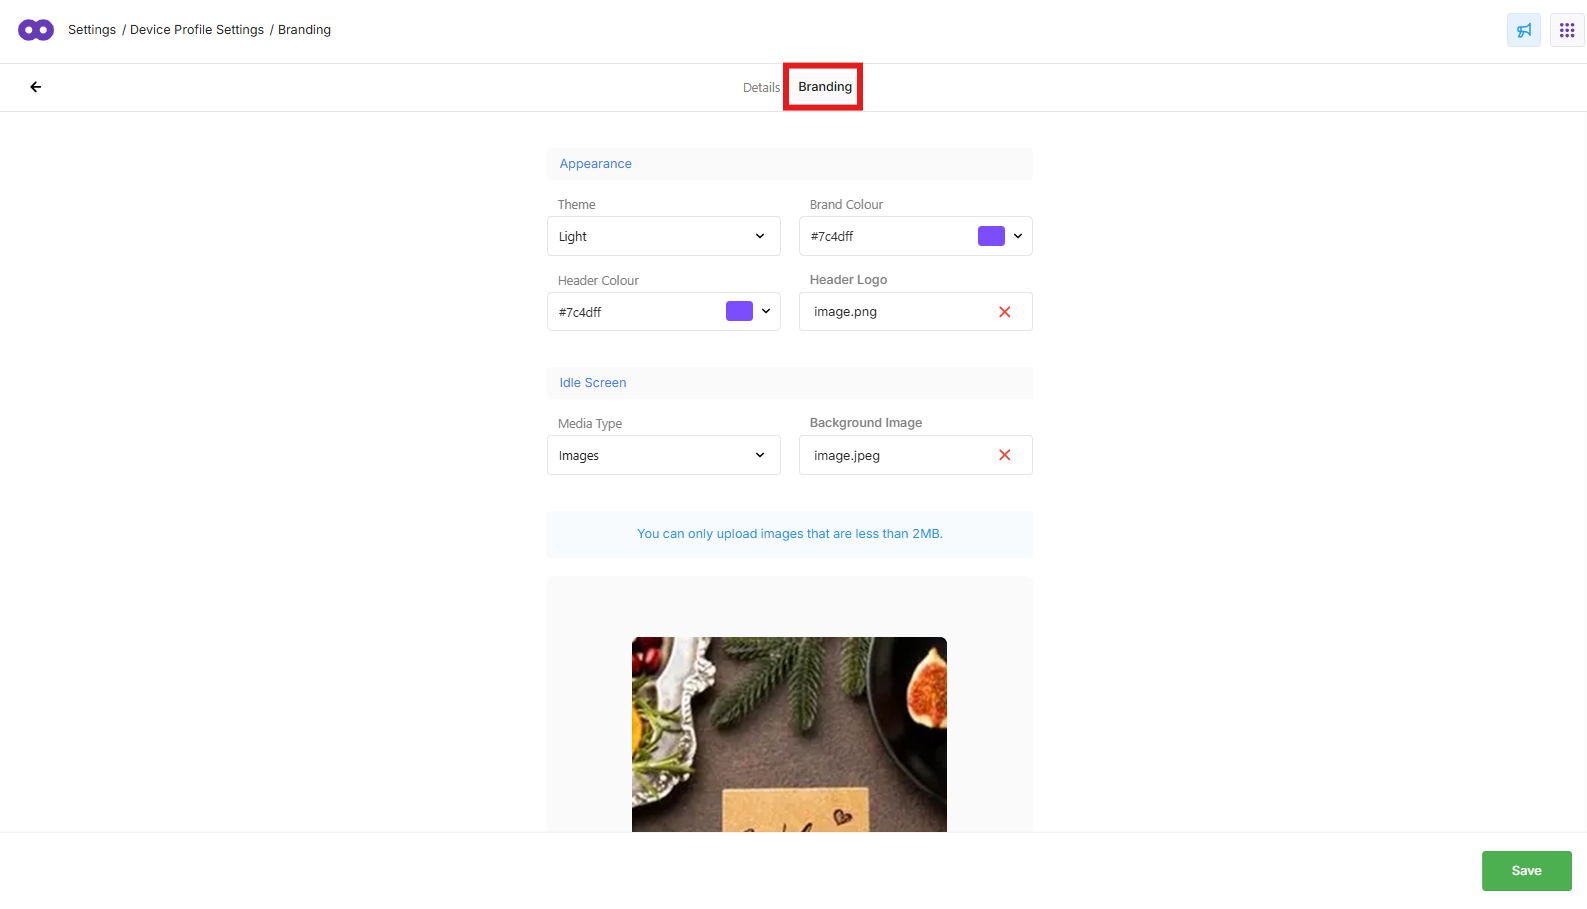
Open the Branding tab to customise the kiosk appearance.
-
Under Appearance:
- Select a Light or Dark theme.
- Select the Brand Colour.
- Select a Header Colour.
- Upload a Header Logo.
-
Under Idle Screen:
- Select Images or GIF.
- Upload the required Background Image.
- Use the preview at the bottom of the page to check how the branding will appear on the kiosk.
- Select Save.
Step 3: Create the Kiosk Device
The Device represents the physical kiosk and connects it to the Device Profile created above.
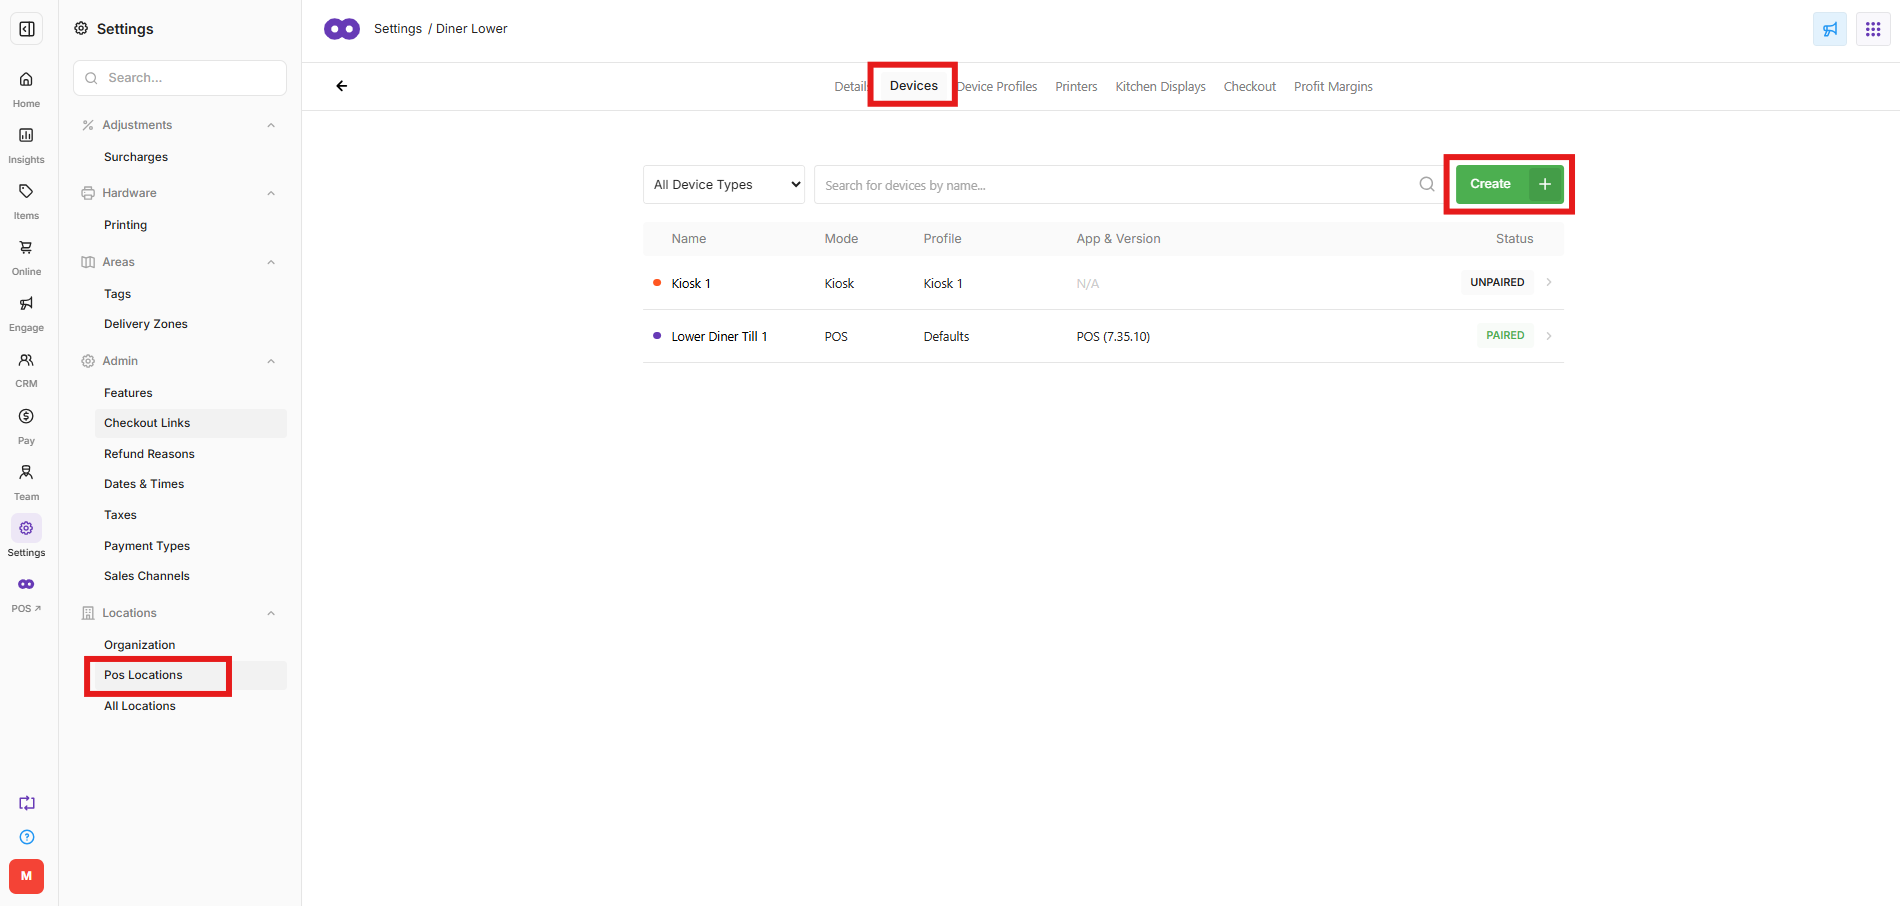
- In Oolio One Back Office, open Settings > Locations.
- Select the Store where the kiosk will be installed.
- Select Devices.
- Select Create +.
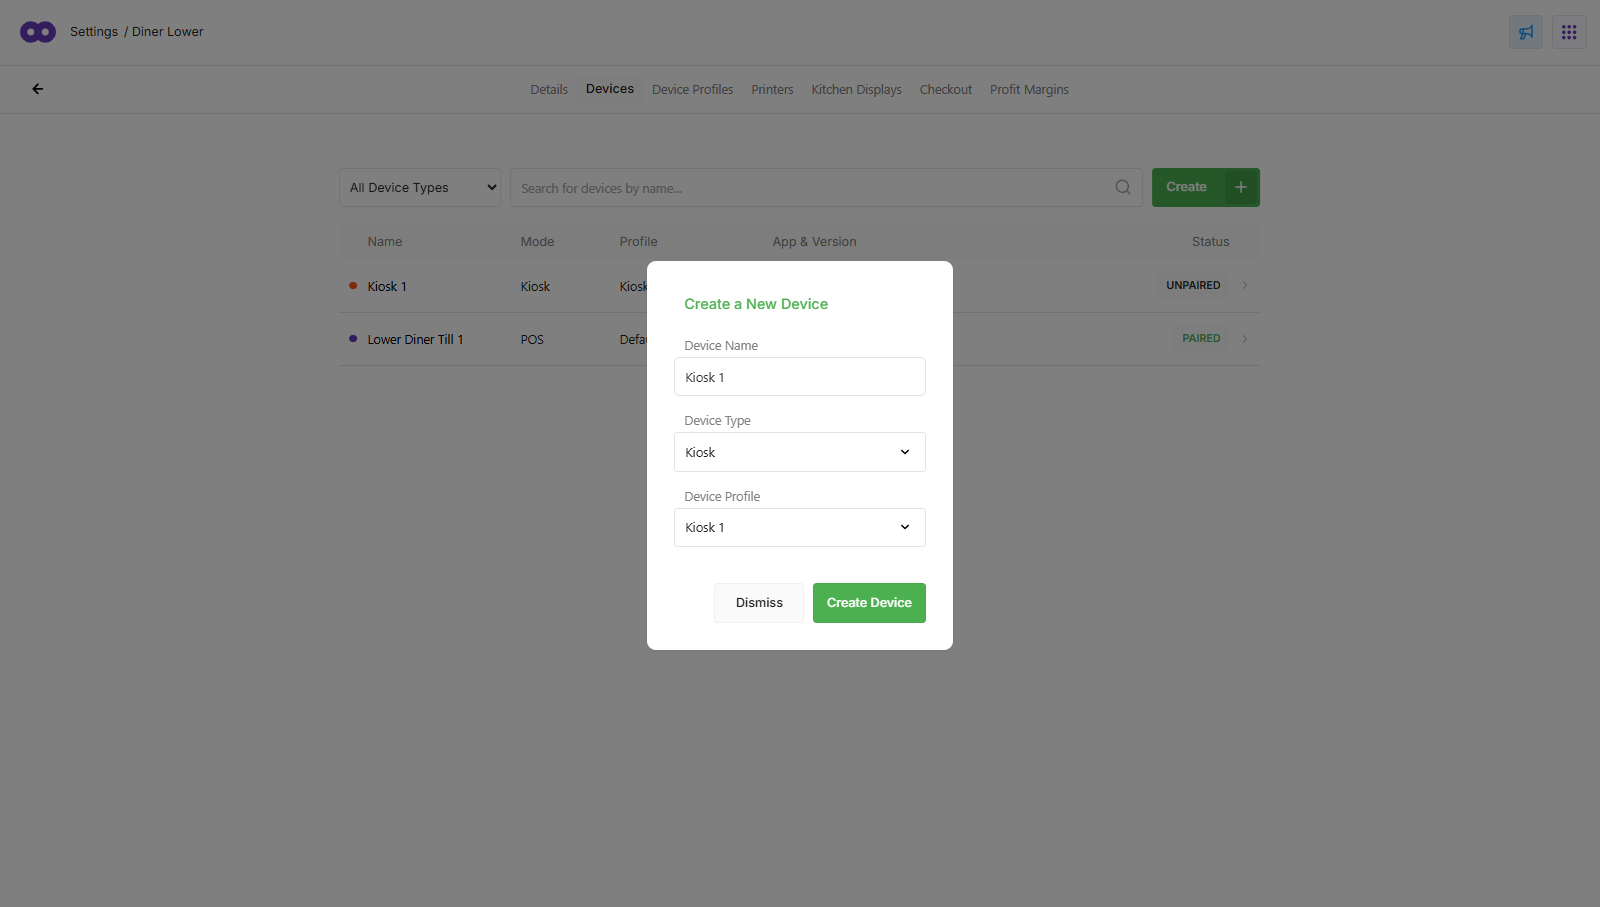
- Enter a Device Name that makes the kiosk easy to identify.
- For Profile Type, select Kiosk.
- Select the required Device Profile.
- Select Create Device.
Step 4: Configure the Kiosk Device
Open the Kiosk Device and configure the settings required for the physical kiosk.
-
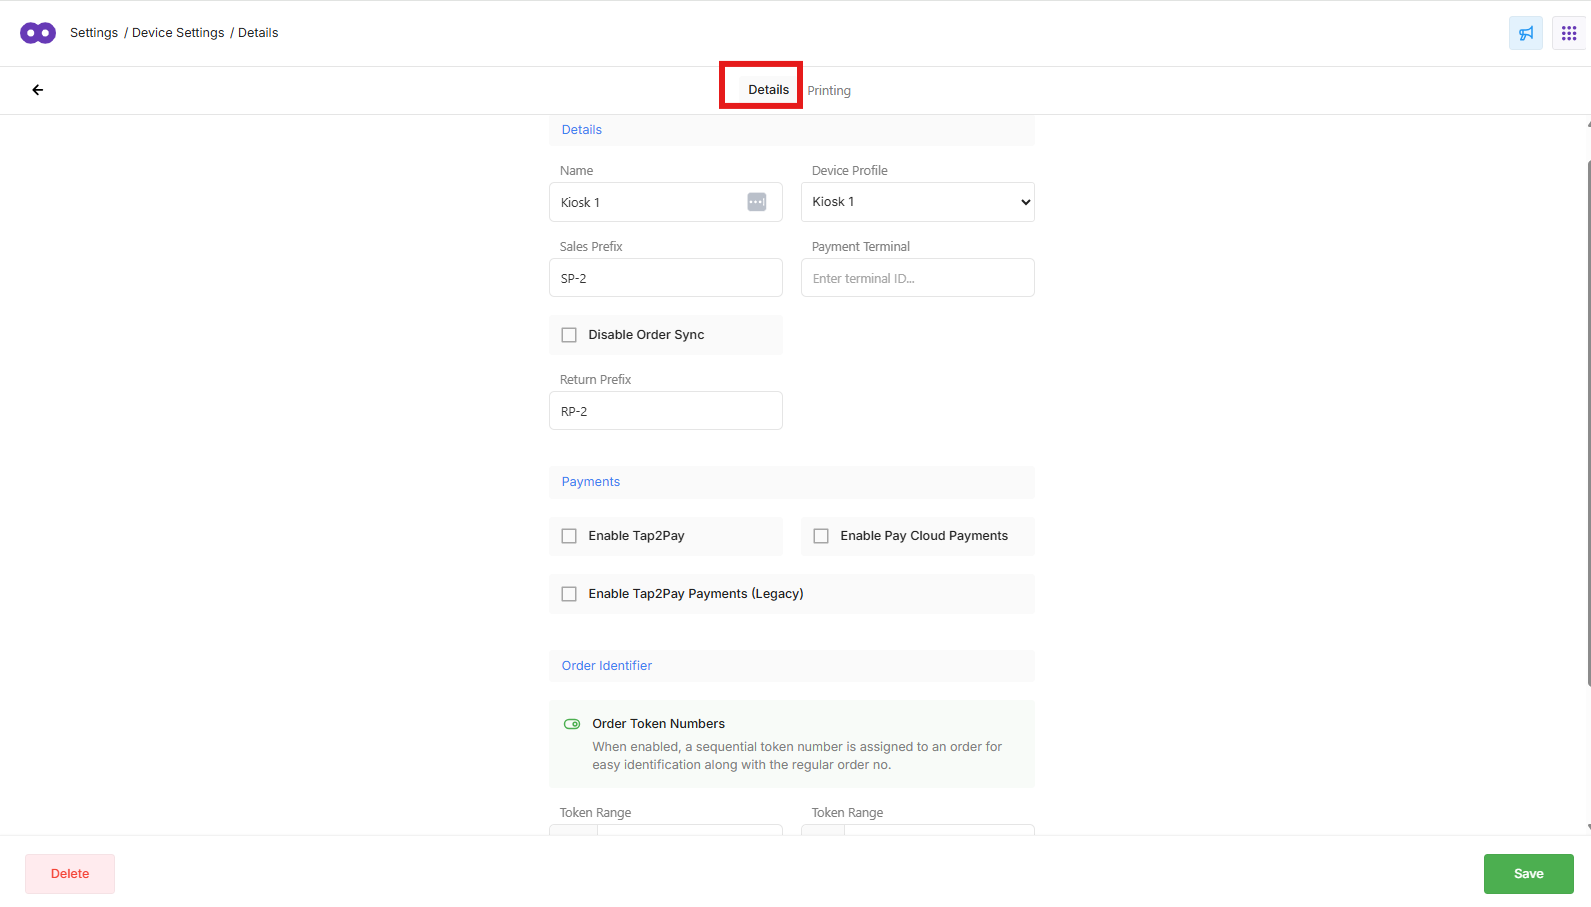
Details:
- Confirm the correct Device Profile is selected.
- Confirm the Sales Prefix used to identify sales created by the kiosk. The default is SP-#, representing Sales Prefix.
- Enter the Oolio Pay Payment Terminal ID.
- Enable Disable Order Sync if the kiosk operates independently and orders do not need to sync with POS.
- If Disable Order Sync is enabled, confirm the Return Prefix used to identify returns created by the kiosk. The default is RP-#, representing Return Prefix.
-
Payments:
-
Configure the payment method required for the kiosk:
- Enable Tap2Pay where Tap on Glass is integrated with the kiosk, then confirm the required Configuration.
- Enable Pay Cloud Payments where cloud-connected payments are used, enter the Paycloud Terminal ID, then select Save.
-
-
Order Identifier:
-
Where token numbers are required:
- Enable Order Token Numbers to issue a token number for orders
- Enter the Token Start and Token End range.
- Enable Reset Order Token Number on End of Day if the token sequence should restart each day.
-
Printing:
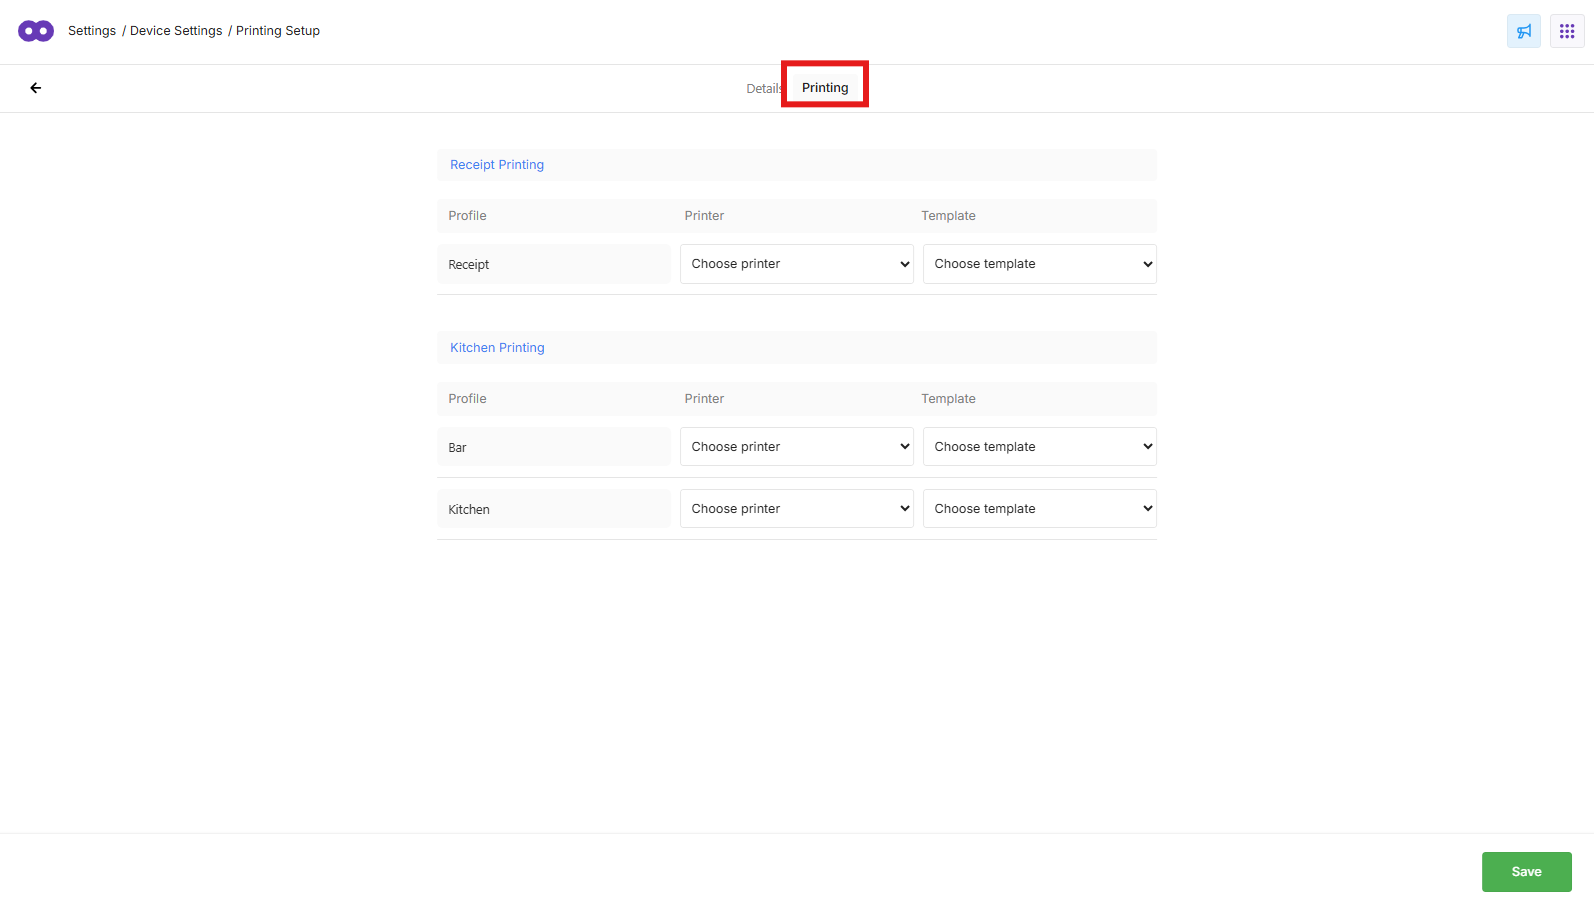
- Open the Printing tab.
- Select the required Printer and Template for each output required from the kiosk.
- Select Save.
Step 5: Connect and authenticate the kiosk
Open the kiosk directly on the device that will be used by customers.
Use either:
- The Oolio Kiosk app, available from the Google Play Store or Apple App Store.
- A supported web browser by opening kiosk.oolio.io.
A QR code is displayed when the kiosk is opened and ready to be paired.
Note: The app or browser must be opened on the kiosk device to complete pairing successfully.
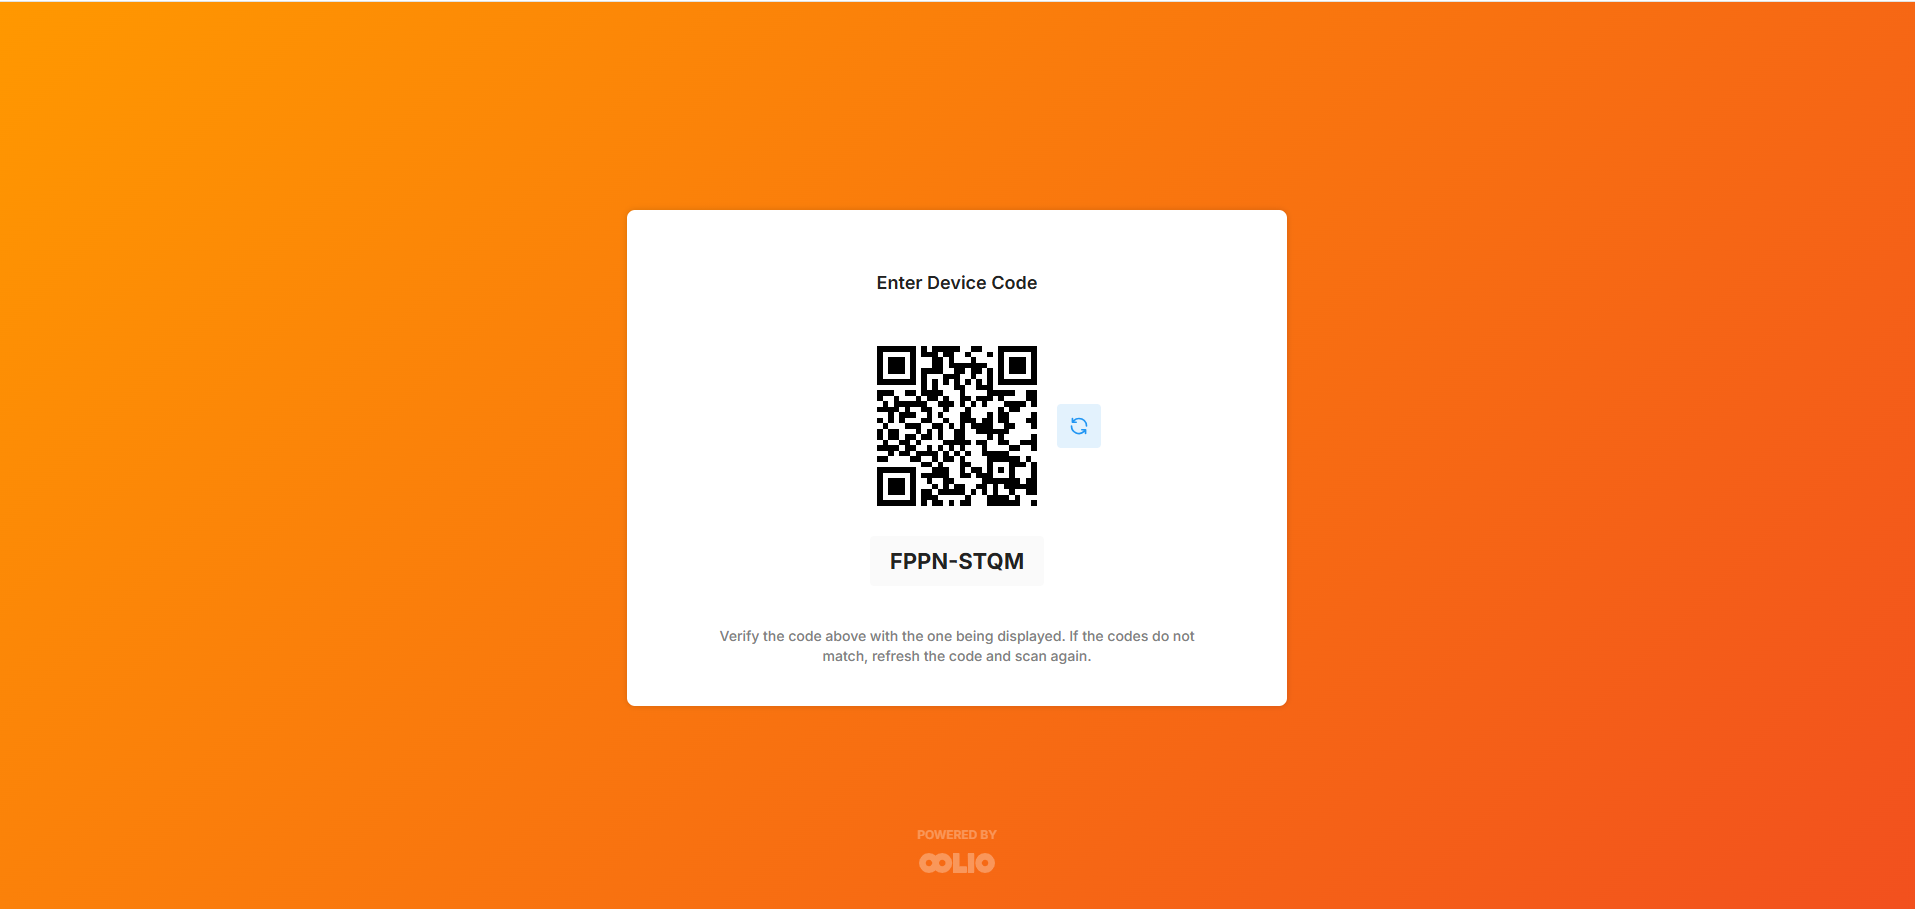
Use a mobile device with a camera to authenticate the kiosk.
- Scan the QR code displayed on the kiosk using the mobile device.
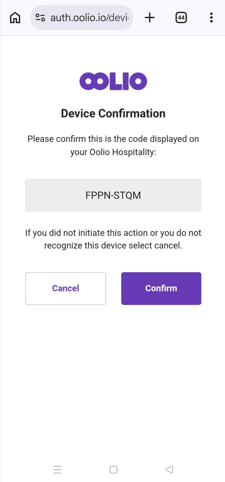
- Open the auth.oolio.io link when prompted.
- Compare the eight-digit code displayed on the mobile device with the code shown on the kiosk.
- If the codes match, confirm the connection.
- If prompted, enter the user name and password to log into Oolio.
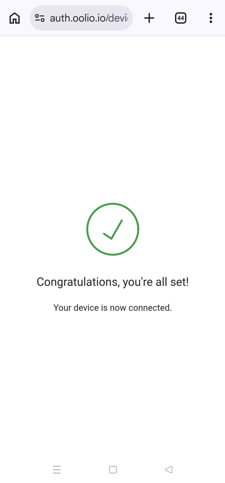
- Wait for the confirmation message to appear on the mobile device.
- Return to the kiosk.
- If multiple Stores are available, select the required Store.
- Select the required Kiosk Device.
The kiosk is now authenticated and loads the configuration associated with the selected Device.
Step 6: Test the kiosk
Complete an end-to-end test before making the kiosk available to customers.
-
Place a test order and confirm:
- The correct Menu, products and prices are displayed.
- The required Order Types are available.
- Products and modifiers can be selected as expected.
- The configured Order Identifier works correctly.
- The kiosk branding displays correctly.
- Payment can be completed using the assigned Oolio Pay terminal.
- The order is created and reaches the required fulfilment workflow.
- Any required kitchen dockets or other configured output prints correctly.
-
If Oolio One Loyalty is configured for the kiosk, also check that customers can identify themselves and that available points or rewards can be viewed and redeemed as expected.
-
Where different menus or pricing apply at different times, test the relevant configurations before go-live.
Once testing is complete, the kiosk is ready for customer use.